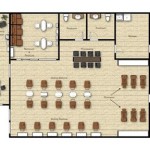
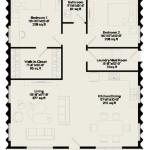
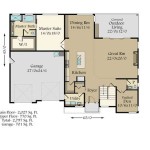
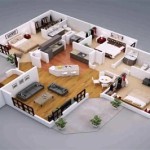
Converting a PDF floor plan to a 3D model is the process of transforming a two-dimensional blueprint into an interactive, three-dimensional representation. This process enables users to visualize the layout and dimensions of a building or space from various angles, enhancing understanding and aiding in planning and design.
3D floor plans are particularly useful for architects, interior designers, and real estate professionals. For instance, architects can create 3D models from PDF floor plans to visualize the spatial relationships between different rooms and assess the functionality of a design. Interior designers can use them to plan furniture placement and experiment with different color schemes in a virtual environment.
Fortunately, there are several free online tools and software applications that allow users to convert PDF floor plans to 3D models with ease. In the following sections, we will explore some of the top free options available and provide step-by-step instructions on how to use them effectively.
When converting PDF floor plans to 3D models for free, there are several key points to consider:
- Choose the right tool
- Prepare the PDF floor plan
- Set up the 3D model
- Add walls and floors
- Create openings
- Add furniture and fixtures
- Export the 3D model
- Consider the accuracy
- Explore different views
- Share and collaborate
By following these steps and considering these points, you can easily convert PDF floor plans to 3D models for free, enhancing your design and planning capabilities.
Choose the right tool
Selecting the right tool for converting PDF floor plans to 3D models for free is crucial to ensure a smooth and efficient process. There are numerous online tools and software applications available, each with its own set of features and capabilities. Consider the following factors when choosing a tool:
Ease of use: The tool should have a user-friendly interface and intuitive navigation, making it accessible to users of all skill levels. Look for tools that provide clear instructions and tutorials to guide you through the conversion process.
File compatibility: Ensure that the tool supports the PDF file format. Some tools may require specific file formats or versions, so check the tool’s documentation to confirm compatibility with your PDF floor plan.
Output quality: The quality of the 3D model depends on the capabilities of the tool. Consider the level of detail and accuracy required for your project. Some tools may offer advanced features such as automatic object recognition and texture mapping, which can enhance the realism of the 3D model.
Additional features: Some tools offer additional features beyond basic conversion, such as the ability to edit the 3D model, add furniture and fixtures, or export to different file formats. Consider the specific requirements of your project and choose a tool that provides the necessary functionality.
Prepare the PDF floor plan
Before converting a PDF floor plan to a 3D model, it is essential to prepare the PDF file to ensure a successful and accurate conversion. Here are the key steps involved in preparing the PDF floor plan:
1. Clean up the PDF floor plan: Remove any unnecessary elements from the PDF floor plan, such as text, dimensions, or annotations. These elements can interfere with the conversion process and result in a cluttered or inaccurate 3D model. Use a PDF editor to delete or hide unwanted elements.
2. Scale the PDF floor plan: Ensure that the PDF floor plan is scaled correctly. The scale should be consistent with the real-world dimensions of the building or space. If the scale is incorrect, the 3D model will be distorted or inaccurate.
3. Simplify the PDF floor plan: Convert the PDF floor plan to a simple black and white line drawing. Remove any colors, textures, or patterns, as these can interfere with the conversion process. The line drawing should clearly represent the walls, doors, and windows of the building or space.
4. Optimize the PDF floor plan: Compress the PDF floor plan to reduce its file size. This will make the conversion process faster and more efficient. Use a PDF optimization tool to reduce the file size without compromising the quality of the line drawing.
Set up the 3D model
Once you have prepared the PDF floor plan, you can set up the 3D model. This involves creating a new 3D project and importing the PDF floor plan into the modeling software.
- Create a new 3D project: Open the 3D modeling software and create a new project. Specify the units of measurement and the scale of the project to match the real-world dimensions of the building or space.
- Import the PDF floor plan: Import the prepared PDF floor plan into the modeling software. The import options may vary depending on the software, but generally, you can select the PDF file and choose the appropriate import settings.
- Position the PDF floor plan: Once imported, position the PDF floor plan in the 3D space. Align the floor plan with the coordinate axes and adjust its position and scale to match the desired location and dimensions of the building or space.
- Set the ground plane: Define the ground plane in the 3D model. This will serve as the reference level for the height of the walls and other elements in the model.
With the 3D model set up, you can proceed to the next step of adding walls and floors to create the basic structure of the building or space.
Add walls and floors
Adding walls and floors is the next step in creating the basic structure of the 3D model. This involves tracing the lines of the PDF floor plan to create walls and defining the floor area of the building or space.
- Trace the walls: Use the line drawing tools in the 3D modeling software to trace the outlines of the walls in the PDF floor plan. Connect the endpoints of the lines to create closed polylines, which will form the base of the walls.
- Extrude the walls: Select the wall polylines and use the extrusion tool to extend them upwards from the ground plane. Specify the height of the walls to match the desired height of the building or space.
- Create the floor: Draw a closed polyline to define the outline of the floor area. Extrude the floor polyline upwards from the ground plane to create a flat surface. Adjust the thickness of the floor to match the desired thickness of the floor material.
- Add openings: Identify the locations of doors and windows in the PDF floor plan. Use the appropriate tools in the 3D modeling software to create openings in the walls for doors and windows. You can also add additional openings for features such as staircases or elevators.
With the walls and floors in place, the basic structure of the 3D model is established. You can now proceed to the next step of creating openings for doors and windows, and adding furniture and fixtures to complete the interior design of the building or space.
Create openings
Creating openings for doors and windows is an important step in converting a PDF floor plan to a 3D model. Openings allow for the movement of people and light within the building or space, and they also add realism and detail to the model.
To create an opening, follow these steps:
- Identify the location of the opening: Determine the location of the door or window in the PDF floor plan. Measure the dimensions of the opening and note its position relative to the walls.
- Create a new sketch: Create a new sketch in the 3D modeling software. This sketch will be used to define the shape and size of the opening.
- Draw the outline of the opening: Use the line drawing tools to draw the outline of the opening in the sketch. The shape of the opening will depend on the type of door or window you are creating.
- Extrude the opening: Select the outline of the opening and use the extrusion tool to extend it through the thickness of the wall. The depth of the extrusion should match the thickness of the wall.
- Add a frame: Optionally, you can add a frame around the opening to give it a more finished look. Draw a rectangle or other shape around the opening in the sketch and extrude it to create the frame.
Once you have created the openings, you can proceed to the next step of adding furniture and fixtures to complete the interior design of the building or space.
Add furniture and fixtures
Adding furniture and fixtures to a 3D model is an important step in completing the interior design of a building or space. Furniture and fixtures provide functionality, comfort, and aesthetic appeal to the environment. They also help to define the purpose and character of each room or space.
To add furniture and fixtures to a 3D model, follow these steps:
- Identify the furniture and fixtures: Determine the types of furniture and fixtures that are needed for the space. Consider the purpose of the space, the number of occupants, and the desired style.
- Create a library of furniture and fixtures: Create a library of 3D models of the furniture and fixtures that you need. You can find free 3D models online or create your own using 3D modeling software.
- Import the furniture and fixtures: Import the 3D models of the furniture and fixtures into the 3D modeling software. Position and scale the models to match the desired size and location within the space.
- Arrange the furniture and fixtures: Arrange the furniture and fixtures in the space to create a functional and visually appealing layout. Consider the flow of movement, the use of space, and the overall aesthetic of the environment.
Once you have added furniture and fixtures to the 3D model, you can proceed to the next step of exporting the model to a desired file format for further use, such as presentations, visualizations, or virtual reality experiences.
Export the 3D model
Once you have completed the 3D model, you can export it to a desired file format for further use. Exporting the model allows you to share it with others, use it in presentations or visualizations, or create virtual reality experiences.
- Select the export format: Choose the file format that you want to export the 3D model to. Common file formats for 3D models include STL, OBJ, FBX, and DAE. Each format has its own advantages and disadvantages, so consider the intended use of the model when selecting the export format.
- Specify the export settings: Depending on the export format, you may have various export settings to configure. These settings can include the level of detail, texture resolution, and other parameters that affect the quality and size of the exported model.
- Export the model: Once you have selected the export format and specified the export settings, click the export button to generate the 3D model file. The export process may take some time, depending on the size and complexity of the model.
- Locate the exported file: The exported 3D model file will be saved to the specified location on your computer. You can now use the model in other applications or share it with others.
Exporting the 3D model is the final step in the process of converting a PDF floor plan to a 3D model for free. By following the steps outlined in this article, you can create accurate and visually appealing 3D models of buildings and spaces, enhancing your design and planning capabilities.
Consider the accuracy
When converting PDF floor plans to 3D models for free, it is important to consider the accuracy of the resulting model. The accuracy of the model will depend on several factors, including the quality of the PDF floor plan, the conversion tool or software used, and the user’s skill in preparing the PDF floor plan and setting up the 3D model.
- Quality of the PDF floor plan: The quality of the PDF floor plan is a key factor in determining the accuracy of the 3D model. A high-quality PDF floor plan will be clear and easy to read, with accurate dimensions and well-defined lines. Avoid using PDF floor plans that are blurry, distorted, or have missing or incomplete information.
- Conversion tool or software: Different conversion tools and software use different algorithms and techniques to convert PDF floor plans to 3D models. Some tools may be more accurate than others, and some may be better suited for certain types of floor plans. It is important to research and select a conversion tool or software that is known for its accuracy and reliability.
- User’s skill: The user’s skill in preparing the PDF floor plan and setting up the 3D model can also affect the accuracy of the model. Users should be familiar with the conversion process and the software being used. Taking the time to carefully prepare the PDF floor plan and set up the 3D model will help to ensure a more accurate result.
- Level of detail: The level of detail in the 3D model will also affect its accuracy. A model with a high level of detail will be more accurate than a model with a low level of detail. However, a model with a high level of detail may also be more time-consuming and difficult to create.
By considering these factors, users can improve the accuracy of their 3D models and create more realistic and useful representations of buildings and spaces.
Explore different views
Once you have created a 3D model of a building or space, you can explore it from different views to gain a better understanding of its layout and design. Many 3D modeling software programs offer a variety of viewing options, including:
Perspective view: The perspective view shows the model as it would appear to the human eye, with objects closer to the viewer appearing larger than objects farther away. This view is useful for getting a general sense of the space and for creating realistic renderings.
Orthographic view: The orthographic view shows the model from a fixed point of view, without any perspective distortion. This view is useful for taking measurements and for creating technical drawings.
Top view: The top view shows the model from directly above, looking down on it. This view is useful for getting an overview of the layout of the space and for planning furniture placement.
Front view: The front view shows the model from directly in front, looking at it head-on. This view is useful for getting a sense of the elevation of the building or space and for creating elevations.
In addition to these standard views, many 3D modeling software programs also offer the ability to create custom views. Custom views can be created by rotating the model around any axis and zooming in or out to get a closer look at specific details. Custom views can be saved and recalled later, making it easy to return to specific viewpoints.
Share and collaborate
Once you have created a 3D model of a building or space, you can share it with others for collaboration and feedback. Many 3D modeling software programs offer built-in collaboration tools that allow multiple users to work on the same model simultaneously. These tools typically include features such as:
Real-time editing: Allows multiple users to make changes to the model in real time, seeing each other’s edits as they are made. This is useful for collaborative design sessions and for getting quick feedback on design changes.
Version control: Keeps track of different versions of the model, allowing users to revert to previous versions if necessary. This is useful for preventing data loss and for managing changes to the model over time.
Cloud storage: Stores the model in the cloud, making it accessible to users from anywhere with an internet connection. This is useful for teams that are working remotely or that need to share the model with clients or other stakeholders.
Export to different formats: Allows users to export the model to a variety of file formats, such as STL, OBJ, FBX, and DAE. This makes it easy to share the model with other software programs or to create 3D prints.
Sharing and collaborating on 3D models can be a great way to improve the design process and to get feedback from others. By using the collaboration features offered by many 3D modeling software programs, teams can work together more efficiently and effectively.


Related Posts