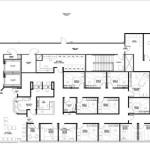
Drawing floor plans is the process of creating a scaled, two-dimensional representation of a building, showing its layout and the arrangement of its rooms. Floor plans are commonly used in architecture, interior design, and construction, and they serve as a fundamental tool for visualizing and communicating spatial arrangements. For instance, architects and designers use floor plans to plan and create the layout of a building, while contractors and builders use them as blueprints to guide their work.
Floor plans typically include walls, windows, doors, stairs, and fixtures, and they may also include additional details such as furniture, appliances, and electrical outlets, depending on the level of detail required. They are often drawn to scale, which means that the measurements on the plan are proportional to the actual dimensions of the building.
In the following sections, we will explore the various types of floor plans, the elements typically included in a floor plan, and the process of creating a floor plan. We will also discuss the benefits of using floor plans and the software and tools available for creating them.
When drawing floor plans, it is important to keep the following key points in mind:
- Use an appropriate scale.
- Draw to scale.
- Include all relevant elements.
- Be consistent in your symbols and notation.
- Use clear and concise labeling.
- Double-check your measurements.
- Use a legend to explain any symbols or abbreviations.
- Consider the purpose of the floor plan.
- Get feedback from others.
By following these guidelines, you can create accurate and informative floor plans that will be useful for a variety of purposes.
Use an appropriate scale.
The scale of a floor plan is the ratio of the distance on the plan to the corresponding distance in the actual building. It is important to use an appropriate scale so that the floor plan is easy to read and understand, and so that measurements can be taken accurately.
- Small-scale plans are used for large buildings or complexes, such as campuses or city blocks. The scale is typically 1/16 inch = 1 foot or 1/8 inch = 1 foot.
- Medium-scale plans are used for medium-sized buildings, such as houses or small office buildings. The scale is typically 1/4 inch = 1 foot or 1/2 inch = 1 foot.
- Large-scale plans are used for small spaces, such as rooms or apartments. The scale is typically 1 inch = 1 foot or 1/2 inch = 1 foot.
- Full-scale plans are drawn at the actual size of the building or space. This type of plan is rarely used, except for very small spaces or for detailed construction drawings.
When choosing a scale, it is important to consider the purpose of the floor plan. For example, a small-scale plan may be sufficient for a general overview of a building, while a large-scale plan may be necessary for detailed construction work.
Draw to scale.
Drawing to scale means that the measurements on the floor plan are proportional to the actual dimensions of the building. This is important for a number of reasons:
- Accuracy: A scaled floor plan allows you to take accurate measurements from the plan, which is essential for planning and construction.
- Clarity: A scaled floor plan is easier to read and understand than a plan that is not to scale, as it is clear how the different parts of the building relate to each other in terms of size and proportion.
- Communication: A scaled floor plan can be easily shared with others, such as contractors, clients, or potential buyers, and they will be able to understand the layout and dimensions of the building without having to visit the site.
- Code compliance: In many jurisdictions, building codes require that floor plans be drawn to scale in order to obtain a building permit.
To draw to scale, you will need to use a scale ruler or a CAD program that allows you to set the scale. Once you have set the scale, you can then measure the actual dimensions of the building and transfer them to the floor plan.
Include all relevant elements.
A floor plan should include all of the relevant elements that are necessary to understand the layout and dimensions of the building. These elements typically include:
- Walls: All of the walls in the building should be shown on the floor plan, including exterior walls, interior walls, and partition walls.
- Windows and doors: All of the windows and doors in the building should be shown on the floor plan, including their size and location.
- Stairs and ramps: All of the stairs and ramps in the building should be shown on the floor plan, including their location and dimensions.
- Fixed fixtures: Any fixed fixtures in the building, such as kitchen cabinets, bathroom vanities, and built-in bookcases, should be shown on the floor plan.
- Furniture: Depending on the purpose of the floor plan, it may be necessary to include furniture on the plan. For example, a floor plan for a furniture layout would need to show the location and dimensions of all of the furniture in the space.
In addition to these basic elements, a floor plan may also include other relevant information, such as:
- Dimensions: The dimensions of the building and its individual rooms should be shown on the floor plan.
- Areas: The areas of the building and its individual rooms may be shown on the floor plan.
- Notes: Any additional notes or information that is necessary to understand the floor plan should be included.
By including all of the relevant elements, a floor plan can provide a complete and accurate representation of the building.
When selecting which elements to include on a floor plan, it is important to consider the purpose of the plan. For example, a floor plan for a construction project will need to include more detailed information than a floor plan for a marketing brochure.
Be consistent in your symbols and notation.
When drawing floor plans, it is important to be consistent in your use of symbols and notation. This will make your floor plans easier to read and understand, and it will also help to avoid confusion.
- Use standard symbols. There are a number of standard symbols that are used to represent different elements on floor plans. For example, walls are typically represented by a solid line, windows are represented by a square or rectangle with a cross inside, and doors are represented by a rectangle with a line inside. It is important to use these standard symbols so that your floor plans are easy to understand by others.
- Be consistent in your notation. In addition to using standard symbols, it is also important to be consistent in your use of notation. For example, if you are using dimensions to show the length and width of a room, make sure that you are using the same units of measurement throughout the floor plan. You should also be consistent in your use of abbreviations and other notation.
- Use a legend. If you are using any non-standard symbols or notation on your floor plan, be sure to include a legend that explains what they mean. This will help others to understand your floor plan.
- Use color coding. Color coding can be a useful way to differentiate between different types of elements on a floor plan. For example, you could use different colors to represent different types of walls, floors, or fixtures.
By being consistent in your use of symbols and notation, you can create floor plans that are clear, concise, and easy to understand.
Use clear and concise labeling.
Clear and concise labeling is essential for making floor plans easy to read and understand. All of the elements on a floor plan should be labeled clearly and concisely, using standard terminology and abbreviations.
Here are some tips for labeling floor plans clearly and concisely:
- Use standard terminology. There is a standard set of terminology that is used to label floor plans. For example, walls are typically labeled as “walls”, windows are labeled as “windows”, and doors are labeled as “doors”. It is important to use this standard terminology so that your floor plans are easy to understand by others.
- Use abbreviations. Abbreviations can be used to save space on floor plans. However, it is important to use abbreviations that are standard and easy to understand. For example, the abbreviation “BR” is commonly used to represent a bedroom, and the abbreviation “KIT” is commonly used to represent a kitchen.
- Be consistent. Be consistent in your use of labeling throughout the floor plan. For example, if you are using the abbreviation “BR” to represent a bedroom, use this abbreviation for all of the bedrooms on the floor plan.
- Use a legend. If you are using any non-standard labels or abbreviations on your floor plan, be sure to include a legend that explains what they mean. This will help others to understand your floor plan.
By following these tips, you can create floor plans that are clear, concise, and easy to understand.
In addition to the tips above, it is also important to consider the following when labeling floor plans:
- The purpose of the floor plan. The purpose of the floor plan will determine the level of detail that is necessary in the labeling. For example, a floor plan for a construction project will need to be more detailed than a floor plan for a marketing brochure.
- The audience for the floor plan. The audience for the floor plan will also determine the level of detail that is necessary in the labeling. For example, a floor plan for a group of architects will need to be more detailed than a floor plan for a group of potential buyers.
By considering these factors, you can create floor plans that are clear, concise, and appropriate for the intended audience.
Double-check your measurements.
It is important to double-check your measurements before finalizing your floor plan. This will help to ensure that your floor plan is accurate and that there are no errors.
- Measure twice, cut once. This old adage applies to floor plans as well as to carpentry. Before you start drawing your floor plan, take the time to measure the building carefully. Double-check your measurements to make sure that they are accurate.
- Use a consistent measuring system. It is important to use a consistent measuring system throughout your floor plan. For example, if you are using feet and inches, make sure that you are using feet and inches for all of your measurements. Do not mix feet and inches with meters and centimeters.
- Use a measuring tape or a laser measuring device. A measuring tape or a laser measuring device can help you to take accurate measurements. Avoid using a ruler or a yardstick, as these tools are not as accurate.
- Double-check your measurements with someone else. Once you have taken your measurements, have someone else double-check them for you. This will help to catch any errors that you may have made.
By double-checking your measurements, you can help to ensure that your floor plan is accurate and error-free.
Use a legend to explain any symbols or abbreviations.
A legend is a key that explains the meaning of the symbols and abbreviations used on a floor plan. Legends are typically placed in the corner of the floor plan, and they can be used to explain a variety of different elements, such as:
- Wall types
- Door types
- Window types
- Fixture types
- Furniture types
- Materials
- Finishes
Legends are an important part of floor plans, as they help to make the plans easier to read and understand. Without a legend, it can be difficult to determine what the different symbols and abbreviations on a floor plan mean.
When creating a legend, it is important to use clear and concise language. The legend should be easy to read and understand, and it should provide all of the necessary information about the symbols and abbreviations used on the floor plan.
Here is an example of a simple legend:
| Symbol | Meaning |
|---|---|
 |
Wall |
 |
Door |
 |
Window |
 |
Fixture |
 |
Furniture |
This legend provides a clear and concise explanation of the symbols used on the floor plan. By using a legend, you can help to make your floor plans easier to read and understand.
Consider the purpose of the floor plan.
The purpose of the floor plan will determine the level of detail and the type of information that is included on the plan. For example, a floor plan for a construction project will need to be more detailed and accurate than a floor plan for a marketing brochure.
Here are some of the different purposes for which floor plans are used:
- Construction: Floor plans are used by architects and builders to design and construct buildings. Construction floor plans typically include detailed information about the building’s structure, materials, and finishes.
- Interior design: Floor plans are used by interior designers to plan the layout of furniture and other interior elements. Interior design floor plans typically include information about the room’s dimensions, furniture placement, and lighting.
- Marketing: Floor plans are used by real estate agents and developers to market properties. Marketing floor plans typically include information about the property’s layout, amenities, and square footage.
- Space planning: Floor plans are used by businesses and organizations to plan the layout of their office or workspace. Space planning floor plans typically include information about the location of workstations, furniture, and equipment.
- Emergency planning: Floor plans are used by emergency responders to plan for and respond to emergencies. Emergency planning floor plans typically include information about the building’s layout, exits, and fire safety features.
When creating a floor plan, it is important to consider the purpose of the plan and to include the appropriate level of detail and information.
Get feedback from others.
Once you have created a floor plan, it is a good idea to get feedback from others. This can help you to identify any errors or omissions in your plan, and it can also help you to improve the overall design.
Here are some tips for getting feedback from others:
- Choose the right people to review your plan. The best people to review your floor plan are those who have experience with the type of plan you are creating. For example, if you are creating a floor plan for a construction project, you should ask a contractor or architect to review your plan.
- Be specific about what you want feedback on. When you ask someone to review your floor plan, be specific about what you want feedback on. For example, you could ask for feedback on the overall layout of the plan, the placement of specific elements, or the use of space.
- Be open to feedback. When you get feedback from others, be open to their suggestions. Even if you don’t agree with all of their suggestions, you may be able to learn something from their feedback.
- Use feedback to improve your plan. Once you have received feedback from others, take the time to review their suggestions and make any necessary changes to your floor plan.
Getting feedback from others can be a valuable way to improve your floor plans. By following these tips, you can get the most out of the feedback process.


/Floorplan-461555447-57a6925c3df78cf459669686.jpg)

Related Posts