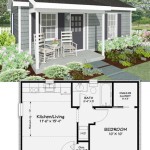
Easy Simple Floor Plan Drawing is the process of creating a simple, yet accurate, representation of a floor plan using basic shapes and measurements. Floor plans are essential for a wide range of construction and design projects, from home renovations to commercial building design. They provide a clear understanding of the layout of a space, including the location of walls, doors, windows, and other features.
Creating a floor plan can seem daunting, but with the right tools and techniques, it can be a relatively simple process. In this article, we will walk you through the basics of easy simple floor plan drawing, covering the essential steps and providing helpful tips along the way. We will also explore some of the benefits of using floor plans, as well as some common mistakes to avoid.
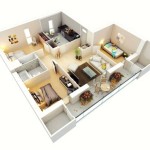
Before we dive into the details, let’s take a closer look at the purpose and benefits of floor plans. Floor plans serve as blueprints for construction projects, allowing builders to visualize the layout of a space before any physical work begins. They also help with planning furniture placement, electrical wiring, and plumbing systems. Floor plans are essential for obtaining building permits and can also be used to create 3D models and virtual tours.
Easy Simple Floor Plan Drawing involves following these key points:
- Measure accurately
- Use a consistent scale
- Draw walls and partitions
- Indicate doors and windows
- Add furniture and fixtures
- Label rooms and spaces
- Include dimensions
- Check for accuracy
- Use a template or software
- Consider using graph paper
By following these simple steps, you can create a floor plan that is both easy to understand and accurate.
Measure accurately
Accurate measurements are essential for creating a floor plan that is both useful and reliable. Before you begin drawing, take the time to carefully measure the space you are working with. This includes measuring the length and width of the room, as well as the location of any walls, doors, and windows.
- Use the right tools: A measuring tape or laser measure is essential for taking accurate measurements. Make sure your tools are calibrated and in good working order.
- Measure twice, cut once: It’s always a good idea to double-check your measurements before you start drawing. This will help you avoid costly mistakes down the road.
- Be consistent: Use the same unit of measurement throughout your floor plan. This will make it easier to compare measurements and avoid confusion.
- Don’t forget the details: In addition to measuring the main dimensions of the room, be sure to measure any alcoves, closets, or other features that could affect the layout.
By taking the time to measure accurately, you can create a floor plan that is both accurate and easy to use.
Use a consistent scale
When drawing a floor plan, it is important to use a consistent scale. This means that all of the measurements on your floor plan should be drawn to the same scale. For example, if you are using a scale of 1/4 inch = 1 foot, then all of the measurements on your floor plan should be drawn at a scale of 1/4 inch = 1 foot. Using a consistent scale will help to ensure that your floor plan is accurate and easy to read.
There are a few different ways to choose a scale for your floor plan. One common method is to use a scale that is based on the size of the room you are drawing. For example, if you are drawing a floor plan of a small room, you might use a scale of 1/4 inch = 1 foot. If you are drawing a floor plan of a large room, you might use a scale of 1/2 inch = 1 foot.
Another method for choosing a scale is to use a scale that is based on the size of the paper you are using. For example, if you are using a standard 8.5 x 11 inch piece of paper, you might use a scale of 1/4 inch = 1 foot. This will allow you to fit the entire floor plan on one page.
Once you have chosen a scale, be sure to stick to it throughout your floor plan. This will help to ensure that your floor plan is accurate and easy to read.
Here are some additional tips for using a consistent scale:
- Use a ruler or measuring tape to measure all of the dimensions on your floor plan.
- Draw all of the lines on your floor plan to scale.
- Label all of the dimensions on your floor plan with the appropriate scale.
By following these tips, you can create a floor plan that is both accurate and easy to read.
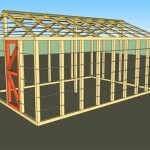
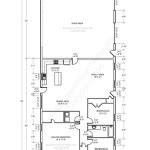
Draw walls and partitions
Once you have measured the space and chosen a scale, you can begin drawing the walls and partitions. Start by drawing the exterior walls of the room. These walls will form the perimeter of the floor plan. Once you have drawn the exterior walls, you can begin drawing the interior walls and partitions. Interior walls divide the room into different spaces, such as bedrooms, bathrooms, and kitchens.
- Use a ruler or straight edge to draw the walls. The walls should be drawn to scale, so be sure to use the same scale that you used to measure the space.
- Draw the walls in the correct order. The exterior walls should be drawn first, followed by the interior walls and partitions.
- Be sure to include all of the doors and windows in the walls. The doors and windows should be drawn to scale, and they should be placed in the correct locations.
- Label the walls with the appropriate dimensions. The dimensions should be written in the same units that you used to measure the space.
By following these tips, you can create a floor plan that is both accurate and easy to read.
Indicate doors and windows
Once you have drawn the walls and partitions, you can begin indicating the doors and windows. Doors and windows are essential for providing access to and from the room, as well as for providing natural light and ventilation. When indicating doors and windows on a floor plan, it is important to include the following information:
- The location of the door or window: The door or window should be drawn in the correct location on the floor plan. This includes the height of the door or window, as well as its width and swing direction.
- The type of door or window: There are many different types of doors and windows available, so it is important to indicate the type of door or window that you are using on your floor plan. This includes the material of the door or window, as well as its style.
- The dimensions of the door or window: The dimensions of the door or window should be drawn to scale on the floor plan. This includes the height and width of the door or window, as well as the thickness of the frame.
By including all of this information, you can create a floor plan that is both accurate and easy to read.
Here are some additional tips for indicating doors and windows on a floor plan:
- Use different symbols to represent different types of doors and windows. For example, you could use a square to represent a door and a circle to represent a window.
- Be sure to label the doors and windows with the appropriate dimensions. The dimensions should be written in the same units that you used to measure the space.
- If the door or window is not a standard size, be sure to indicate the custom dimensions on the floor plan.
By following these tips, you can create a floor plan that is both accurate and easy to read.
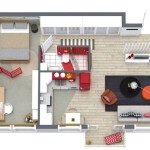
Add furniture and fixtures
Once you have drawn the walls, partitions, doors, and windows, you can begin adding furniture and fixtures to your floor plan. Furniture and fixtures are essential for making a space functional and comfortable. When adding furniture and fixtures to a floor plan, it is important to consider the following factors:
- The size of the space: The size of the space will determine how much furniture and fixtures you can add. Be sure to measure the space carefully before you begin adding furniture and fixtures.
- The purpose of the space: The purpose of the space will also determine the type of furniture and fixtures that you add. For example, a living room will require different furniture and fixtures than a bedroom.
- The style of the space: The style of the space will also influence the type of furniture and fixtures that you add. For example, a modern space will require different furniture and fixtures than a traditional space.
Once you have considered these factors, you can begin adding furniture and fixtures to your floor plan. Here are some tips for adding furniture and fixtures to a floor plan:
- Use different symbols to represent different types of furniture and fixtures. For example, you could use a square to represent a table and a circle to represent a chair.
- Be sure to label the furniture and fixtures with the appropriate dimensions. The dimensions should be written in the same units that you used to measure the space.
- If the furniture or fixture is not a standard size, be sure to indicate the custom dimensions on the floor plan.
By following these tips, you can create a floor plan that is both accurate and easy to read.
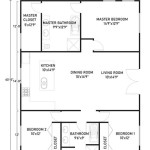
Label rooms and spaces
Once you have added furniture and fixtures to your floor plan, you can begin labeling the rooms and spaces. Labeling the rooms and spaces will help to identify the different areas of the floor plan and make it easier to understand the layout of the space.
- Use clear and concise labels. The labels should be easy to read and understand. Avoid using abbreviations or jargon.
- Be consistent with your labeling. Use the same font and size for all of the labels on your floor plan.
- Place the labels in a logical location. The labels should be placed in a location where they will be easy to read and understand. Avoid placing labels in areas where they will be obstructed by furniture or fixtures.
- Label all of the rooms and spaces on your floor plan. This includes the main rooms, such as the living room, kitchen, and bedrooms, as well as smaller spaces, such as closets and bathrooms.
By following these tips, you can create a floor plan that is both accurate and easy to read.
Include dimensions
Including dimensions on your floor plan is essential for creating a document that is both accurate and easy to use. Dimensions provide important information about the size and shape of the space, and they can be used to calculate square footage, plan furniture placement, and make other important decisions.
- Use the correct units of measurement. The most common units of measurement for floor plans are inches, feet, and meters. Be sure to use the same units of measurement throughout your floor plan.
- Measure carefully. It is important to measure the space accurately before you begin drawing your floor plan. This will ensure that your dimensions are correct and that your floor plan is accurate.
- Label all of the dimensions. Be sure to label all of the dimensions on your floor plan with the appropriate units of measurement. This will make it easy to understand the size and shape of the space.
- Use a consistent scale. All of the dimensions on your floor plan should be drawn to the same scale. This will make it easy to compare dimensions and avoid confusion.
By following these tips, you can create a floor plan that is both accurate and easy to use.
Check for accuracy
Once you have completed your floor plan, it is important to check for accuracy. This will ensure that your floor plan is error-free and that it accurately represents the space.
- Review your measurements. Double-check all of the measurements on your floor plan to ensure that they are correct. This includes the dimensions of the walls, doors, windows, and furniture.
- Check the scale of your floor plan. Make sure that all of the dimensions on your floor plan are drawn to the same scale. This will help to ensure that your floor plan is accurate and easy to read.
- Walk through the space and compare it to your floor plan. This will help you to identify any errors or omissions in your floor plan.
- Get feedback from others. Ask a friend, family member, or colleague to review your floor plan and provide feedback. This can help you to identify any areas that need improvement.
By following these tips, you can create a floor plan that is both accurate and easy to use.
Use a template or software
Using a template or software can make the process of drawing a floor plan much easier. There are many different floor plan templates and software programs available, both free and paid. Some popular options include:
- SmartDraw: SmartDraw is a paid software program that offers a wide range of floor plan templates and tools.
- Floorplanner: Floorplanner is a free online floor plan creator that offers a variety of templates and tools.
- SketchUp: SketchUp is a free 3D modeling software program that can be used to create floor plans.
- Planner 5D: Planner 5D is a paid software program that offers a variety of floor plan templates and tools.
When choosing a floor plan template or software program, it is important to consider the following factors:
- The size and complexity of your project: If you are drawing a simple floor plan for a small space, you may be able to use a free online template or software program. However, if you are drawing a complex floor plan for a large space, you may need to use a paid software program with more advanced features.
- Your budget: There are both free and paid floor plan templates and software programs available. The cost of a paid software program will vary depending on the features and functionality that it offers.
- Your skill level: If you are new to floor plan drawing, you may want to choose a template or software program that is easy to use. However, if you are more experienced, you may want to choose a software program with more advanced features.
Once you have chosen a floor plan template or software program, you can begin drawing your floor plan. Be sure to follow the instructions provided by the template or software program. Once you have completed your floor plan, you can save it as a file and print it out.
Using a template or software can make the process of drawing a floor plan much easier. By following the tips above, you can choose the right template or software program for your needs and create a floor plan that is both accurate and easy to read.
Consider using graph paper
Graph paper can be a helpful tool for drawing floor plans. Graph paper is a type of paper that is covered in a grid of evenly spaced lines. This grid can help you to draw straight lines and to keep your floor plan to scale.
- Accuracy: Graph paper can help you to create a more accurate floor plan. The grid lines can help you to align walls and objects, and they can also help you to measure distances more accurately.
- Ease of use: Graph paper is easy to use, even for beginners. The grid lines can help you to keep your floor plan organized and neat.
- Flexibility: Graph paper is available in a variety of sizes and grid spacings. This means that you can choose the graph paper that is best suited for your project.
- Cost-effective: Graph paper is a relatively inexpensive way to create a floor plan. You can purchase a pad of graph paper for a few dollars at most office supply stores.
If you are new to floor plan drawing, or if you are looking for a way to improve the accuracy of your floor plans, consider using graph paper. Graph paper can help you to create a floor plan that is both accurate and easy to read.


/Floorplan-461555447-57a6925c3df78cf459669686.jpg)

Related Posts