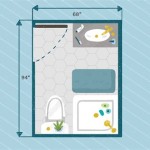
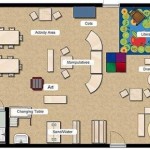
A golf simulator floor plan is a diagram that outlines the layout and dimensions of a space intended for the installation of a golf simulator. It includes key elements such as the hitting area, screen dimensions, required clearance, furniture placement, and any additional features within the simulation room. Understanding the intricacies of a golf simulator floor plan is crucial for optimizing the user experience and ensuring a seamless and enjoyable golfing experience.
Before embarking on the installation of a golf simulator, meticulous planning is essential. This involves careful consideration of the available space, taking into account the dimensions of the simulator components and the necessary clearance for an unobstructed swing. Factors like ceiling height, room shape, and any potential obstructions must be thoroughly assessed to determine the optimal placement of the simulator within the designated area. The floor plan acts as a blueprint, guiding the installer in positioning the simulator’s components and ensuring they align seamlessly with the intended layout and design of the room.
In the subsequent sections, we will delve deeper into the essential considerations for developing an effective golf simulator floor plan. We will explore key elements to include, potential obstacles to account for, and best practices for optimizing the layout and design of your golf simulator space.
Key Considerations for Golf Simulator Floor Plans
- Room Dimensions: Determine the available space for the simulator.
- Ceiling Height: Ensure sufficient height for an unobstructed swing.
- Hitting Area: Plan for ample swing space and distance from the screen.
- Screen Size: Choose a screen size that fits the room and provides an immersive experience.
- Furniture Placement: Consider furniture arrangement to optimize space and comfort.
- Clearance: Allow for clearance around the simulator for safety and accessibility.
- Power Supply: Ensure adequate power supply for the simulator and any additional equipment.
- Ventilation: Plan for proper ventilation to maintain a comfortable environment.
- Lighting: Optimize lighting to minimize glare and enhance visibility.
Conclusion
By carefully considering these factors and incorporating them into a well-designed floor plan, you can create an optimal golf simulator space that meets your specific needs and provides an enjoyable and immersive golfing experience.
Room Dimensions: Determine the available space for the simulator.
The first step in planning a golf simulator floor plan is to determine the available space. This involves carefully measuring the dimensions of the room where the simulator will be installed, taking into account any existing furniture or obstacles that may impact the layout.
- Room Length: Measure the length of the room from wall to wall. This will determine the maximum distance available for the hitting area and the placement of the screen.
- Room Width: Measure the width of the room at its widest point. This will determine the amount of space available for the simulator components and any additional furniture or seating.
- Ceiling Height: Measure the height of the ceiling. This is crucial to ensure that there is sufficient clearance for an unobstructed swing and to accommodate the height of the simulator enclosure or screen.
- Obstructions: Identify and measure any obstacles in the room, such as windows, doors, columns, or furniture. These obstacles may impact the placement of the simulator components and require adjustments to the floor plan.
By accurately determining the room dimensions and taking into account any potential obstructions, you can create a floor plan that optimizes the use of space and ensures a seamless and enjoyable golfing experience.
Ceiling Height: Ensure sufficient height for an unobstructed swing.
Ceiling height is a crucial factor to consider when planning a golf simulator floor plan. It directly impacts the comfort and safety of the user, as well as the overall golfing experience.
- Minimum Height: For a comfortable and unobstructed swing, a minimum ceiling height of 9 feet (2.7 meters) is recommended. This height allows for a full backswing and follow-through without any risk of hitting the ceiling or any overhead obstructions.
- Recommended Height: For an optimal golfing experience, a ceiling height of 10 feet (3 meters) or higher is recommended. This additional height provides ample clearance for high shots and allows for a more natural and realistic swing.
- Simulator Enclosure Height: If the golf simulator enclosure extends upwards, such as in the case of a fully enclosed simulator, the ceiling height must be adjusted to accommodate the height of the enclosure. Measure the height of the enclosure and ensure that there is sufficient clearance between the top of the enclosure and the ceiling.
- Overhead Obstructions: Inspect the ceiling for any overhead obstructions, such as light fixtures, ceiling fans, or ductwork. These obstructions may interfere with the swing and pose a safety hazard. If there are any overhead obstructions, adjust the placement of the simulator or consider raising the ceiling height to ensure a clear and safe hitting area.
By carefully considering the ceiling height and addressing any potential obstructions, you can create a golf simulator space that provides a comfortable, safe, and enjoyable golfing experience.
Hitting Area: Plan for ample swing space and distance from the screen.
The hitting area is the centerpiece of any golf simulator, and it requires careful planning to ensure a comfortable and enjoyable golfing experience. Two key considerations for the hitting area are swing space and distance from the screen.
- Swing Space: Ample swing space is crucial for a natural and unrestricted golf swing. The hitting area should provide enough room for the golfer to take a full backswing without hitting any obstacles or feeling cramped. A minimum of 8 feet (2.4 meters) of clearance on either side of the golfer is recommended, but more space is always preferred.
- Distance from the Screen: The distance between the hitting area and the screen is equally important. This distance affects the accuracy and realism of the golf simulation. A minimum distance of 8 feet (2.4 meters) from the screen is recommended, but a distance of 10 feet (3 meters) or more is ideal. This provides enough space for the ball to travel and for the simulator to accurately track the ball’s trajectory.
- Ceiling Height: The ceiling height in the hitting area should be considered in conjunction with the swing space and distance from the screen. A high ceiling allows for a more natural swing and reduces the risk of hitting the ceiling. A minimum ceiling height of 9 feet (2.7 meters) is recommended, but 10 feet (3 meters) or higher is preferred.
- Simulator Enclosure: If the golf simulator enclosure extends forward into the hitting area, it is important to ensure that it does not impede the golfer’s swing or obstruct their view of the screen. The enclosure should be positioned so that there is ample clearance for the golfer to swing comfortably and see the screen clearly.
By carefully considering these factors and incorporating them into the golf simulator floor plan, you can create a hitting area that provides a realistic and enjoyable golfing experience.
Screen Size: Choose a screen size that fits the room and provides an immersive experience.
The screen size is a crucial element in the golf simulator floor plan, as it directly impacts the realism and immersion of the golfing experience. When selecting a screen size, there are several key considerations to keep in mind:
- Room Size: The size of the room will dictate the maximum screen size that can be accommodated. Measure the available space and determine the largest screen that can fit comfortably within the room without overwhelming the space.
- Viewing Distance: The viewing distance from the hitting area to the screen should be considered. A larger screen may require a greater viewing distance to avoid eye strain and ensure a comfortable golfing experience.
- Immersive Experience: A larger screen provides a more immersive experience by filling the golfer’s field of view and enhancing the realism of the simulated environment. However, it is important to choose a screen size that is appropriate for the room size and viewing distance to avoid feeling overwhelmed or cramped.
- Simulator Type: Different types of golf simulators may have specific screen size requirements. Consult the manufacturer’s specifications to determine the recommended screen size for your particular simulator model.
By carefully considering these factors, you can choose a screen size that optimizes the golfing experience, provides a realistic and immersive environment, and complements the overall design of the golf simulator space.
Furniture Placement: Consider furniture arrangement to optimize space and comfort.
In addition to the essential components of a golf simulator, such as the hitting area, screen, and simulator enclosure, careful consideration should be given to the placement of furniture within the golf simulator space. Well-planned furniture arrangement can optimize space utilization, enhance comfort, and contribute to an overall enjoyable golfing experience.
Seating Arrangement: Comfortable seating is essential for golfers to relax and enjoy their golfing sessions. Consider placing a sofa or armchairs in a comfortable viewing area facing the screen. Ensure that the seating is positioned at an appropriate distance from the screen to avoid eye strain and provide a comfortable viewing angle.
Storage Solutions: Golf equipment and accessories can accumulate quickly. Incorporate storage solutions into the floor plan to keep the space organized and clutter-free. Utilize shelves, cabinets, or drawers to store golf clubs, balls, shoes, and other gear. By keeping the space tidy, golfers can easily access their equipment and maintain a clean and inviting environment.
Additional Amenities: Depending on the available space and the desired level of comfort, additional amenities can be incorporated into the golf simulator space. A small refrigerator can provide convenient access to refreshments, while a sound system can enhance the golfing experience with immersive audio. Consider adding a putting green or a chipping area to complement the golf simulator and provide a more comprehensive practice space.
Overall Design: The furniture and dcor in the golf simulator space should complement the overall design and ambiance. Choose furniture pieces that are aesthetically pleasing and match the style of the room. Consider the lighting in the space and incorporate lamps or overhead lighting to create a comfortable and inviting atmosphere.
Clearance: Allow for clearance around the simulator for safety and accessibility.
Ensuring sufficient clearance around the golf simulator is paramount for safety and accessibility. Careful planning should be given to the placement of the simulator and its components to avoid any potential hazards or obstacles that may hinder movement or compromise the golfing experience.
- Safe Swinging Space: Ample clearance on either side of the hitting area is crucial to allow for a full and unrestricted golf swing. Golfers should be able to swing freely without the fear of hitting any surrounding objects or walls. A minimum clearance of 3 feet (0.9 meters) on each side is recommended to ensure a safe and comfortable swinging motion.
- Unobstructed Walking Area: Clear pathways should be maintained around the simulator to allow for easy movement and access to different areas of the room. This is especially important for retrieving golf balls, adjusting the simulator settings, or moving around the space comfortably. Ensure that there are no obstacles or tripping hazards in the vicinity of the simulator.
- Ventilation and Airflow: Adequate clearance around the simulator is essential for proper ventilation and airflow. Golf simulators generate heat and require proper ventilation to maintain a comfortable environment for users. Allow sufficient space around the simulator to ensure unrestricted airflow and prevent overheating.
- Equipment Accessibility: If additional equipment, such as a putting green or a chipping area, is incorporated into the golf simulator space, ensure that there is enough clearance around these areas to allow for easy access and use. Golfers should be able to move freely between different sections of the space without feeling cramped or restricted.
By carefully considering and incorporating these clearance requirements into the golf simulator floor plan, you can create a safe, accessible, and enjoyable golfing environment that enhances the overall experience for users.
Power Supply: Ensure adequate power supply for the simulator and any additional equipment.
Electrical Requirements: Golf simulators require a dedicated power supply to operate efficiently. The electrical requirements vary depending on the specific simulator model and its components. It is crucial to consult the manufacturer’s specifications to determine the voltage, amperage, and power consumption of the simulator. Ensure that the electrical system in the room where the simulator is installed can meet these requirements.
Circuit Protection: The power supply for the golf simulator should be protected by a circuit breaker or fuse to prevent electrical hazards. The circuit breaker or fuse should be sized appropriately to handle the electrical load of the simulator and any additional equipment. Proper circuit protection helps prevent electrical fires and damage to the simulator.
Surge Protection: Golf simulators and electronic equipment are susceptible to damage from power surges. Installing a surge protector can help safeguard the simulator and its components from voltage spikes and transients. Choose a surge protector with a sufficient joule rating to handle the potential electrical surges in your area.
Additional Equipment: If additional equipment, such as a launch monitor, computer, or sound system, will be used with the golf simulator, their power requirements should also be considered. Ensure that there are enough power outlets and that the electrical system can handle the combined load of all the equipment.
Proper Wiring: All electrical wiring should be installed by a qualified electrician in accordance with local electrical codes. Improper wiring can pose safety hazards and compromise the performance of the golf simulator. Use high-quality cables and connectors to ensure a reliable power supply and minimize electrical interference.
Ventilation: Plan for proper ventilation to maintain a comfortable environment.
Ensuring proper ventilation in the golf simulator space is essential for maintaining a comfortable and healthy environment for users. Inadequate ventilation can lead to excessive heat buildup, stale air, and discomfort, which can negatively impact the golfing experience.
- Air Circulation: Golf simulators generate heat, and prolonged use can cause the room temperature to rise. Proper ventilation is crucial to ensure adequate air circulation and prevent the buildup of warm, stagnant air. Installing exhaust fans or opening windows can help circulate fresh air and maintain a comfortable temperature.
- Humidity Control: Golf simulators can also contribute to increased humidity levels, especially in enclosed spaces. High humidity can lead to discomfort and affect the performance of the simulator. Consider using a dehumidifier to control humidity levels and create a more pleasant environment for golfing.
- Odor Reduction: The use of golf clubs and balls can release odors into the air. Proper ventilation helps dissipate these odors and maintain a fresh and inviting atmosphere in the golf simulator space.
- Health Benefits: Adequate ventilation provides numerous health benefits. It helps prevent the buildup of harmful pollutants, reduces the risk of respiratory issues, and promotes overall well-being. Ensuring proper ventilation in the golf simulator space contributes to a healthier and more enjoyable golfing experience.
By incorporating proper ventilation into the golf simulator floor plan, you can create a comfortable and healthy environment that enhances the overall golfing experience and promotes well-being.
Lighting: Optimize lighting to minimize glare and enhance visibility.
Proper lighting is essential in a golf simulator space to ensure optimal visibility, reduce glare, and enhance the overall golfing experience. Careful planning and implementation of a well-designed lighting scheme can significantly improve the accuracy, realism, and enjoyment of golf simulation.
Glare Reduction: Glare occurs when bright light sources directly enter the eyes, causing discomfort and impairing visibility. In a golf simulator space, glare can be a significant issue, especially if the light sources are positioned incorrectly. To minimize glare, avoid placing light fixtures directly above or behind the golfer’s line of sight. Instead, opt for indirect lighting or use diffusers to scatter and soften the light.
Enhanced Visibility: Adequate lighting is crucial for golfers to see the screen clearly and accurately track the ball’s trajectory. The lighting should provide sufficient illumination without creating harsh shadows or dark spots on the screen. Consider using a combination of ambient lighting, task lighting, and accent lighting to achieve optimal visibility. Ambient lighting provides general illumination, task lighting focuses on specific areas like the hitting zone, and accent lighting highlights key features or decorative elements.
Adjustable Lighting: The ability to adjust the lighting in the golf simulator space allows for customization and optimization based on personal preferences and playing conditions. Dimmable lights or lights with adjustable color temperature enable golfers to fine-tune the lighting to suit their needs. For example, warmer light settings can create a more relaxing and immersive atmosphere, while cooler light settings can enhance focus and concentration.
Natural Light Considerations: If the golf simulator space has windows or natural light sources, it is important to consider their impact on the lighting scheme. Natural light can provide additional illumination, but it can also create glare and reflections on the screen. Use curtains, blinds, or window treatments to control the amount of natural light entering the space and minimize potential distractions.


Related Posts