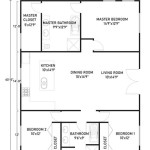
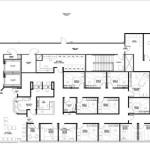
Creating a floor plan involves the detailed drawing of a space, which illustrates the layout of rooms, walls, doors, windows, and other structural features from an overhead perspective. Floor plans serve as essential tools for architects, interior designers, builders, and homeowners alike, enabling them to visualize and plan the construction or renovation of buildings.
A well-crafted floor plan not only defines the spatial relationships within a structure but also provides valuable insights into the flow of traffic, natural light distribution, and overall functionality of the space. It allows users to make informed decisions regarding furniture placement, electrical and plumbing systems, and structural modifications.
In this comprehensive guide, we will delve into the multifaceted world of floor plan creation, providing practical steps and essential tips to help you create precise and informative floor plans for any residential or commercial space.
Creating a floor plan involves several key steps:
- Measure the space accurately
- Sketch the layout
- Add walls, doors, and windows
- Include furniture and fixtures
- Draw to scale
- Use symbols and abbreviations
- Add dimensions and labels
- Review and refine
Following these steps will help you create clear and informative floor plans that meet your specific needs.
Measure the space accurately
The foundation of a precise floor plan lies in accurate measurements. Before embarking on the drawing process, it is crucial to obtain exact dimensions of the space you intend to represent.
- Measure the perimeter:
Using a measuring tape or laser distance meter, determine the length of each wall in the room. Start from a fixed point and proceed clockwise or counterclockwise, carefully noting down the measurements in feet and inches (or meters and centimeters, depending on your preferred unit of measurement).
- Measure interior walls and partitions:
If the space includes any interior walls, partitions, or built-in elements, measure their lengths and positions relative to the perimeter walls. This will help establish the overall layout and configuration of the space.
- Measure doors and windows:
Accurately measure the width and height of all doors and windows within the space. Note their exact locations along the walls and any specific features, such as double doors or sliding windows.
- Measure ceiling height:
Using a measuring tape or laser level, determine the height of the ceiling from the floor to the ceiling’s highest point. This measurement is crucial for determining the overall volume of the space and for planning vertical elements such as built-in shelves or mezzanine levels.
Taking accurate measurements ensures that your floor plan reflects the true dimensions and proportions of the space, providing a solid foundation for further planning and design decisions.
Sketch the layout
Once you have gathered all necessary measurements, the next step is to sketch out the basic layout of the space. This rough sketch will serve as the foundation for your detailed floor plan.
- Start with a simple outline:
Begin by drawing a simple outline of the perimeter walls, using straight lines to represent the walls and corners of the room. This outline will provide the basic framework for your floor plan.
- Indicate doors and windows:
Mark the locations of all doors and windows on your sketch, using simple symbols or shapes to represent their positions and swing directions.
- Sketch interior walls and partitions:
If the space includes any interior walls, partitions, or built-in elements, sketch them into your layout, paying attention to their relative positions and dimensions.
- Add major fixtures and furniture:
To enhance the functionality of your floor plan, consider sketching in the locations of major fixtures and furniture, such as kitchen appliances, bathroom fixtures, or large pieces of furniture. This will help visualize the space’s potential usage and flow.
While this initial sketch may not be to scale or highly detailed, it will provide a valuable starting point for developing a precise and informative floor plan.
Add walls, doors, and windows
Once you have a basic sketch of the space’s layout, you can begin adding walls, doors, and windows to create a more detailed floor plan.
- Walls:
Using a ruler or drafting software, draw the walls of the space to scale, ensuring that their lengths and thicknesses accurately reflect the measurements you took earlier. Pay attention to the placement of doors and windows within the walls.
- Doors:
Draw symbols to represent the doors in the space, indicating their swing direction and any specific features such as double doors or sliding doors. Label each door with its corresponding room name or function.
- Windows:
Similar to doors, draw symbols to represent the windows in the space, indicating their type (e.g., single-hung, casement, bay window) and dimensions. Label each window with its corresponding room name or function.
- Layers:
Consider using different layers in your drawing software to organize the various elements of your floor plan. For instance, you could have separate layers for walls, doors, windows, and furniture, allowing you to easily edit and modify each element as needed.
By carefully adding walls, doors, and windows, you will create a more comprehensive and informative floor plan that accurately represents the space’s layout and features.
Include furniture and fixtures
To enhance the functionality and realism of your floor plan, consider including furniture and fixtures within the space. This will provide a more complete representation of how the space can be used and furnished.
Start by identifying the major pieces of furniture and fixtures that will be placed in the space, such as sofas, beds, tables, chairs, kitchen appliances, bathroom fixtures, and storage units. Determine their approximate dimensions and shapes based on standard sizes or specific product specifications.
Draw symbols or shapes to represent the furniture and fixtures in your floor plan, using different layers or colors to distinguish them from the walls, doors, and windows. Label each item with its corresponding name or function to provide clarity and ease of reference.
Pay attention to the scale and proportions of the furniture and fixtures relative to the space. Ensure that they are drawn to an appropriate size and that they fit comfortably within the available space without overcrowding or creating obstacles.
By including furniture and fixtures in your floor plan, you will create a more comprehensive and informative representation of the space, allowing you to visualize its potential usage and functionality.
Draw to scale
Drawing to scale is a crucial aspect of creating precise and informative floor plans. It ensures that the dimensions and proportions of the space are accurately represented on paper or digital media.
- Maintain consistent units:
Throughout your floor plan, it is essential to maintain consistent units of measurement, such as feet and inches or meters and centimeters. This consistency ensures accuracy and prevents confusion when interpreting the plan.
- Choose an appropriate scale:
Select a scale that allows you to fit the entire space onto your drawing while maintaining a reasonable level of detail. Common scales used for floor plans include 1/4 inch = 1 foot, 1/8 inch = 1 foot, and 1/16 inch = 1 foot.
- Use a ruler or drafting software:
When drawing to scale, use a ruler or drafting software to ensure that the lengths and distances in your floor plan are accurate. Carefully measure and transfer the dimensions from your measurements to your drawing.
- Check proportions:
As you draw, continually check the proportions of the space and its elements to ensure that they are consistent with the actual measurements. This will help prevent distortions or inaccuracies in your floor plan.
By drawing to scale, you create a floor plan that accurately reflects the dimensions and proportions of the space, making it a valuable tool for planning, construction, or renovation projects.
Use symbols and abbreviations
To enhance the clarity and conciseness of your floor plan, consider using standard symbols and abbreviations to represent specific elements and features within the space.
- Furniture and fixtures:
Use standardized symbols to represent common furniture items and fixtures, such as beds, sofas, tables, chairs, sinks, toilets, and appliances. These symbols are widely recognized and help to quickly identify the function of each item in the floor plan.
- Building components:
Abbreviations can be used to indicate specific building components, such as W for windows, D for doors, and S for stairs. These abbreviations save space and provide a clear understanding of the plan’s layout.
- Materials and finishes:
Use abbreviations or symbols to indicate the materials and finishes used in different areas of the space. For example, “T” could represent tile flooring, “C” for carpet, and “W” for wood paneling.
- Electrical and plumbing:
Use specific symbols to represent electrical outlets, light fixtures, plumbing fixtures, and other utilities. These symbols help to convey the location and type of electrical and plumbing elements within the space.
By incorporating symbols and abbreviations into your floor plan, you can create a more informative and easily interpretable document that effectively communicates the design and layout of the space.
Add dimensions and labels
Adding dimensions and labels to your floor plan is crucial for providing precise and clear information about the space. Dimensions specify the exact measurements of walls, rooms, and other elements, while labels identify the function of each room or area.
- Measure and label rooms:
Measure the length and width of each room and label them accordingly. For example, “Bedroom 1: 12′ x 10′” or “Kitchen: 15′ x 12′”.
- Indicate wall lengths:
Measure and label the length of each wall. This is particularly important for exterior walls and walls with windows or doors.
- Label doors and windows:
Indicate the width and height of doors and windows, along with their swing direction. Label them with their corresponding room names or functions.
- Add other relevant dimensions:
Include dimensions for built-in elements, such as closets, shelves, or kitchen appliances. This helps to convey the space’s storage capacity and functionality.
By adding dimensions and labels to your floor plan, you create a comprehensive and informative document that clearly communicates the layout, measurements, and purpose of each space.
Review and refine
Once you have completed the initial layout and added all necessary elements to your floor plan, it is crucial to take a step back and review your work carefully. This review process helps to identify any errors, inconsistencies, or areas for improvement.
- Check for accuracy:
Verify that all measurements and dimensions are correct and consistent throughout the floor plan. Ensure that the scale is appropriate and that the overall layout accurately reflects the actual space.
- Assess functionality:
Examine the flow of traffic within the space and consider whether the arrangement of rooms, doors, and windows promotes efficient movement and functionality. Identify any potential obstacles or bottlenecks and make adjustments as needed.
- Evaluate aesthetics:
Step back from a designer’s perspective and assess the overall aesthetics of the floor plan. Consider the balance, symmetry, and visual appeal of the space. Look for opportunities to enhance the visual flow and create a harmonious and inviting environment.
- Seek feedback:
If possible, share your floor plan with others, such as colleagues, family members, or a professional designer, and seek their feedback. Fresh perspectives can help identify areas for improvement and ensure that the plan meets the needs and expectations of all stakeholders.
By thoroughly reviewing and refining your floor plan, you can enhance its accuracy, functionality, aesthetics, and overall effectiveness as a planning and communication tool.


Related Posts