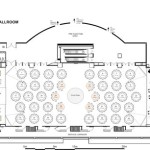
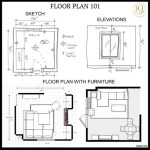
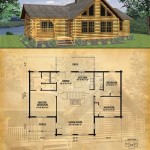
A floor plan is a two-dimensional drawing that shows the layout of a building, including the location of walls, doors, windows, and other features. Drawing a floor plan to scale is important for a variety of reasons. For example, it can be used to:
Create a record of an existing building.
Plan renovations or additions to a building.
Layout furniture or equipment in a space.
Comply with building codes or zoning regulations.
In this article, we will provide step-by-step instructions on how to draw a floor plan to scale. We will cover everything from measuring the space to creating the final drawing.
Here are 8 important points to remember when drawing a floor plan to scale:
- Measure the space accurately.
- Draw to scale.
- Include all walls, doors, and windows.
- Show the location of furniture and equipment.
- Label all rooms and spaces.
- Use a legend to explain symbols and abbreviations.
- Check your work for accuracy.
- Draw neatly and professionally.
By following these tips, you can create a floor plan that is accurate, informative, and easy to understand.
Measure the space accurately.
The first step to drawing a floor plan to scale is to measure the space accurately. This means measuring the length and width of each room, as well as the location of all doors, windows, and other features.
- Use the right tools. A tape measure or laser measuring device is essential for accurate measurements.
- Measure carefully. Be sure to measure from the same point each time, and to hold the tape measure or laser level.
- Record your measurements. Write down the measurements for each room and feature, so that you can refer to them later.
- Check your work. Once you have measured the space, double-check your measurements to make sure that they are accurate.
By following these tips, you can ensure that your floor plan is accurate and to scale.
Draw to scale.
Once you have measured the space accurately, you need to draw it to scale. This means that the dimensions of your drawing will be proportional to the dimensions of the actual space. For example, if a room is 10 feet long and 8 feet wide, then you would draw it on your floor plan as 2 inches long and 1.6 inches wide, assuming you are using a scale of 1/4 inch = 1 foot.
To draw to scale, you will need to use a scale ruler or a drafting scale. A scale ruler is a ruler that has different scales printed on it, such as 1/4 inch = 1 foot, 1/2 inch = 1 foot, and so on. A drafting scale is a more precise tool that is used for architectural and engineering drawings.
Once you have chosen a scale, you can begin drawing your floor plan. Start by drawing the outline of the space, using the measurements that you took earlier. Then, add the walls, doors, windows, and other features. Be sure to label each room and space, and use a legend to explain any symbols or abbreviations that you use.
By following these tips, you can create a floor plan that is accurate, informative, and easy to understand.
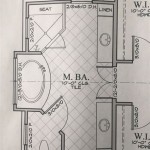
Include all walls, doors, and windows.
When drawing a floor plan to scale, it is important to include all walls, doors, and windows. This will help to create an accurate representation of the space, and will make it easier to plan renovations or additions.
- Walls:
Walls should be drawn as solid lines, with the thickness of the line representing the thickness of the wall. If there are any openings in the wall, such as doorways or windows, these should be indicated with dashed lines.
- Doors:
Doors should be drawn as rectangles, with the width of the rectangle representing the width of the door. The direction that the door opens should be indicated with a small arrow.
- Windows:
Windows should be drawn as rectangles, with the width and height of the rectangle representing the width and height of the window. The type of window should be indicated with a small symbol, such as a circle for a round window or a square for a square window.
By following these tips, you can ensure that your floor plan includes all of the necessary information, and that it is accurate and easy to understand.
Show the location of furniture and equipment.
Once you have drawn the walls, doors, and windows, you can begin to add the furniture and equipment. This will help to create a more complete picture of the space, and will make it easier to plan the layout of the room.
- Choose the right symbols. There are many different symbols that can be used to represent furniture and equipment. For example, a bed can be represented by a rectangle with a headboard, a chair can be represented by a circle, and a table can be represented by a square.
- Draw to scale. The furniture and equipment should be drawn to scale, so that the size and location of each item is accurate.
- Label each item. Each item of furniture and equipment should be labeled, so that it is easy to identify.
- Use a legend. If you are using a lot of different symbols, it is helpful to create a legend that explains what each symbol represents.
By following these tips, you can create a floor plan that shows the location of all furniture and equipment, and that is accurate and easy to understand.
Label all rooms and spaces.
Once you have drawn the walls, doors, windows, and furniture, you should label all of the rooms and spaces. This will help to identify the purpose of each space, and will make it easier to understand the layout of the floor plan.
- Use clear and concise labels. The labels should be easy to read and understand, and should accurately describe the space that they are labeling.
- Be consistent with your labeling. Use the same font and size for all of the labels, and place them in a consistent location within each space.
- Use a legend. If you are using a lot of different labels, it is helpful to create a legend that explains what each label represents.
By following these tips, you can create a floor plan that is easy to read and understand, and that accurately represents the layout of the space.
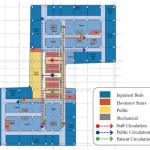
Use a legend to explain symbols and abbreviations.
A legend is a key that explains the meaning of symbols and abbreviations that are used on a floor plan. This can be helpful for understanding the layout of the space, and for identifying the different features that are shown on the plan.
- Create a list of symbols and abbreviations.
Start by creating a list of all of the symbols and abbreviations that you are using on your floor plan. This could include symbols for furniture, equipment, doors, windows, and other features.
- Define each symbol and abbreviation.
Once you have a list of symbols and abbreviations, you need to define each one. This can be done in a table, or in a separate document.
- Place the legend on the floor plan.
Once you have defined all of the symbols and abbreviations, you need to place the legend on the floor plan. The legend should be placed in a location where it is easy to find and read.
- Use the legend to interpret the floor plan.
Once you have created a legend, you can use it to interpret the floor plan. By looking up the symbols and abbreviations in the legend, you can understand the layout of the space and the different features that are shown on the plan.
By following these tips, you can create a floor plan that is easy to read and understand, and that accurately represents the layout of the space.
Check your work for accuracy.
Once you have finished drawing your floor plan, it is important to check your work for accuracy. This means checking to make sure that the measurements are correct, that the symbols and abbreviations are used correctly, and that the overall layout of the plan is accurate.
- Check the measurements.
Use a tape measure or ruler to check the measurements of the space against the measurements on your floor plan. Make sure that the walls, doors, windows, and other features are all drawn to scale.
- Check the symbols and abbreviations.
Make sure that you are using the correct symbols and abbreviations for all of the features on your floor plan. Refer to your legend to make sure that you are using the symbols and abbreviations correctly.
- Check the overall layout.
Step back from your floor plan and take a look at the overall layout. Make sure that the space flows well and that all of the features are in the correct location. If something doesn’t look right, go back and check your measurements and symbols.
- Have someone else review your work.
If possible, ask someone else to review your floor plan for accuracy. This could be a friend, family member, or colleague. A fresh pair of eyes can often spot errors that you may have missed.
By following these tips, you can check your work for accuracy and ensure that your floor plan is accurate and reliable.
Draw neatly and professionally.
The final step to drawing a floor plan to scale is to draw neatly and professionally. This means that your floor plan should be easy to read and understand, and that it should be free of errors.
- Use a sharp pencil and a ruler.
A sharp pencil will help you to draw clean, precise lines. A ruler will help you to draw straight lines and to measure distances accurately.
- Draw to scale.
Make sure that all of the features on your floor plan are drawn to scale. This means that the dimensions of your drawing should be proportional to the dimensions of the actual space.
- Use clear and concise labels.
The labels on your floor plan should be easy to read and understand. Use clear and concise language, and avoid using abbreviations or jargon.
- Check your work for errors.
Once you have finished drawing your floor plan, check it for errors. Look for any mistakes in the measurements, symbols, or labels. If you find any errors, correct them before finalizing your floor plan.
By following these tips, you can draw a floor plan that is neat, professional, and accurate.


Related Posts