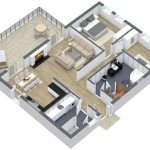
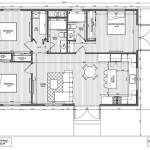
Defining floor plans involves understanding their core purpose and functionality. Simply put, floor plans are detailed drawings that depict the layout of a building or a specific floor within it. They provide a comprehensive view of the space, including the arrangement of rooms, walls, windows, doors, and other architectural elements.
The significance of floor plans extends beyond mere visual representations. They serve as vital tools in various fields, including architecture, interior design, construction, and real estate. Architects and designers rely on floor plans to conceptualize and plan the layout of buildings, ensuring efficient use of space and optimal functionality. Contractors utilize floor plans for construction purposes, guiding them in accurately building the structure as per design specifications.
With their multifaceted applications, floor plans are essential documents throughout a building’s lifecycle. Let’s delve into the steps involved in creating precise and informative floor plans.
Creating precise floor plans involves adhering to specific guidelines and best practices. Here are eight important points to consider:
- Use precise measurements
- Draw to scale
- Include all rooms and spaces
- Label all elements clearly
- Use standard symbols and conventions
- Create a legend for clarity
- Review and refine
- Use appropriate software
By following these principles, you can create accurate and informative floor plans that effectively communicate design intent and facilitate efficient construction and space planning.
Use precise measurements
Precise measurements are the foundation of accurate floor plans. Each measurement should be carefully taken and recorded to ensure the plan’s fidelity to the actual space. Inaccurate measurements can lead to costly errors during construction or renovation, so it’s crucial to prioritize precision from the outset.
To obtain precise measurements, use a measuring tape or laser measuring device. Start by measuring the overall dimensions of the space, including the length, width, and height. Then, measure the individual rooms and spaces within the building, noting the dimensions of walls, windows, doors, and any other architectural features.
It’s important to measure both the interior and exterior dimensions of walls. Interior dimensions are taken from inside the room, while exterior dimensions are taken from the outside. This distinction ensures that the floor plan accurately reflects the space’s actual size and layout.
Record all measurements clearly and legibly. Use a notebook or digital device to keep track of your measurements, and be sure to label each measurement with its corresponding location. This will help you easily refer back to your measurements as you create the floor plan.
By using precise measurements, you can create a floor plan that is accurate and reliable. This will save time and prevent costly mistakes during construction or renovation, and it will also ensure that the final product meets the intended design specifications.
Draw to scale
Drawing to scale is an essential principle of floor plan creation. It ensures that the floor plan accurately represents the actual size and proportions of the space. To draw to scale, choose a scale factor that is appropriate for the size of the space and the level of detail required. A common scale factor is 1/4 inch equals 1 foot, which means that 1 inch on the floor plan represents 4 feet in the actual space.
Once you have chosen a scale factor, use a ruler or drafting software to draw the walls, windows, doors, and other architectural features to scale. It’s important to maintain the correct proportions of the space, so be sure to measure carefully and draw accurately.
Drawing to scale is not only important for creating an accurate floor plan, but it also makes it easier to calculate areas and distances. For example, if you know the scale factor of your floor plan, you can use a ruler to measure the length of a wall on the plan and then multiply that measurement by the scale factor to determine the actual length of the wall.
By drawing to scale, you can create a floor plan that is both accurate and informative. This will be a valuable tool for planning construction or renovation projects, as well as for space planning and interior design.
Here are some additional tips for drawing to scale:
- Use a sharp pencil and a ruler or T-square to draw straight lines.
- Use a protractor to draw angles accurately.
- Use a scale to measure distances accurately.
- Label all measurements clearly and legibly.
- Double-check your work to ensure accuracy.
Include all rooms and spaces
A comprehensive floor plan should include all rooms and spaces within the building, both interior and exterior. This includes not only the main living areas, such as bedrooms, bathrooms, and kitchens, but also secondary spaces such as closets, hallways, and utility rooms. Exterior spaces, such as patios, decks, and garages, should also be included on the floor plan.
When including all rooms and spaces, it is important to be consistent in the level of detail. For example, if you are including closets on the floor plan, be sure to include all closets, regardless of size. Similarly, if you are including exterior spaces, be sure to include all exterior spaces, regardless of size or function.
Including all rooms and spaces on the floor plan is important for several reasons. First, it provides a complete picture of the building’s layout and space allocation. This can be helpful for planning construction or renovation projects, as well as for space planning and interior design. Second, including all rooms and spaces can help to identify potential problems or inefficiencies in the building’s layout. For example, you may notice that there is not enough closet space or that the kitchen is too small. By identifying these problems early on, you can make changes to the floor plan to address them.
Finally, including all rooms and spaces on the floor plan can help to ensure that the building is constructed or renovated to meet your specific needs and requirements. By having a complete picture of the building’s layout, you can make informed decisions about the size, shape, and function of each space.
Here are some additional tips for including all rooms and spaces on a floor plan:
- Start by creating a rough sketch of the building’s layout.
- Walk through the building and identify all of the rooms and spaces.
- Measure each room and space and record the dimensions on the sketch.
- Draw the floor plan to scale, using the measurements you recorded.
- Label each room and space clearly and legibly.
- Double-check your work to ensure accuracy.
Label all elements clearly
Labeling all elements clearly is essential for creating a floor plan that is both accurate and informative. Each room, space, and architectural feature should be labeled with its corresponding name or function. This will help to identify the purpose of each space and to understand the overall layout of the building.
When labeling elements on a floor plan, it is important to use clear and concise language. Avoid using abbreviations or jargon that may not be familiar to everyone. For example, instead of labeling a room as “MBR,” label it as “Master Bedroom.” Instead of labeling a space as “Util,” label it as “Utility Room.”
In addition to labeling rooms and spaces, it is also important to label architectural features such as windows, doors, and stairs. This will help to identify the location of these features and to understand how they relate to the overall layout of the building.
Here are some additional tips for labeling elements clearly on a floor plan:
- Use a consistent font and lettering style throughout the floor plan.
- Make sure that the labels are large enough to be easily read.
- Place the labels in a logical location near the corresponding element.
- Double-check your work to ensure that all elements are labeled correctly.
By labeling all elements clearly, you can create a floor plan that is both accurate and informative. This will be a valuable tool for planning construction or renovation projects, as well as for space planning and interior design.
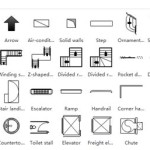
Use standard symbols and conventions
Using standard symbols and conventions is essential for creating floor plans that are both accurate and easy to understand. Standard symbols and conventions provide a common language for architects, builders, and other professionals involved in the design and construction process.
There are many different types of standard symbols and conventions used in floor plans. Some of the most common include:
- Symbols for walls: Walls are typically represented by a single line or a double line. The thickness of the line indicates the thickness of the wall. Different types of walls, such as load-bearing walls and non-load-bearing walls, are represented by different symbols.
- Symbols for doors: Doors are represented by a rectangle with a line indicating the direction of the door swing. Different types of doors, such as sliding doors and French doors, are represented by different symbols.
- Symbols for windows: Windows are represented by a rectangle with a line indicating the location of the window frame. Different types of windows, such as casement windows and double-hung windows, are represented by different symbols.
- Symbols for stairs: Stairs are represented by a series of lines indicating the steps of the stairs. The direction of the stairs is indicated by an arrow.
In addition to these basic symbols, there are also many other symbols and conventions used to represent different types of architectural features, such as fireplaces, plumbing fixtures, and electrical outlets. It is important to familiarize yourself with these symbols and conventions in order to create accurate and informative floor plans.
Here are some additional tips for using standard symbols and conventions on floor plans:
- Use a consistent set of symbols and conventions throughout your floor plan.
- Place symbols in a logical location near the corresponding element.
- Make sure that the symbols are large enough to be easily read.
- Double-check your work to ensure that all symbols are used correctly.
By using standard symbols and conventions, you can create floor plans that are both accurate and easy to understand. This will be a valuable tool for planning construction or renovation projects, as well as for space planning and interior design.
Create a legend for clarity
A legend is a key that explains the symbols and conventions used on a floor plan. It is typically placed in the corner of the floor plan and provides a quick and easy way to identify the different elements of the plan. A well-crafted legend can greatly improve the clarity and usability of a floor plan.
When creating a legend, it is important to include all of the symbols and conventions used on the floor plan. Each symbol or convention should be clearly labeled and described. It is also important to use consistent terminology throughout the legend. For example, if you are using the symbol “W” to represent windows, be sure to use the same symbol throughout the legend and on the floor plan itself.
In addition to symbols and conventions, a legend can also include other information, such as the scale of the floor plan and the date it was created. This information can be helpful for users who need to understand the context of the floor plan.
Here are some additional tips for creating a clear and informative legend:
- Use a consistent font and lettering style throughout the legend.
- Make sure that the labels are large enough to be easily read.
- Place the legend in a logical location on the floor plan, such as in the corner or along the border.
- Double-check your work to ensure that all symbols and conventions are included and correctly labeled.
By creating a legend for clarity, you can make your floor plans more accurate and easy to understand. This will be a valuable tool for planning construction or renovation projects, as well as for space planning and interior design.
Here is an example of a legend for a floor plan:
Symbol | Description
—|—|
W | Window
D | Door
S | Stairs
F | Fireplace
C | Closet
KB | Kitchen
BR | Bedroom
BA | Bathroom
Review and refine
Once you have created a draft of your floor plan, it is important to review and refine it to ensure that it is accurate, complete, and easy to understand. Here are four tips for reviewing and refining your floor plan:
- Check for accuracy: Make sure that the floor plan accurately reflects the actual layout of the building. Check the dimensions of each room and space, and verify that all architectural features are correctly represented.
- Check for completeness: Ensure that all rooms and spaces are included on the floor plan, and that all architectural features are labeled correctly. Also, check for any missing information, such as the scale of the floor plan or the date it was created.
- Check for clarity: Make sure that the floor plan is easy to read and understand. Use clear and concise language, and avoid using abbreviations or jargon. Also, make sure that the symbols and conventions used on the floor plan are consistent and easy to interpret.
- Get feedback: Ask a friend, colleague, or family member to review your floor plan and provide feedback. They may be able to identify errors or omissions that you have overlooked.
By following these tips, you can create a floor plan that is accurate, complete, and easy to understand. This will be a valuable tool for planning construction or renovation projects, as well as for space planning and interior design.
Use appropriate software
Choosing the right software for creating floor plans is essential for producing accurate and professional-looking results. There are many different software programs available, ranging from simple and easy-to-use programs to more advanced and feature-rich programs. The best software for you will depend on your specific needs and experience level.
If you are new to floor plan creation, you may want to start with a simple program that is easy to learn and use. There are many free and paid software programs available that are designed for beginners. These programs typically offer a limited range of features, but they can be a good way to get started with floor plan creation.
As you gain more experience, you may want to upgrade to a more advanced software program that offers more features and functionality. These programs typically cost more than beginner-level programs, but they offer a wider range of features and options. Some advanced software programs even allow you to create 3D floor plans and virtual walkthroughs.
Here are some of the factors to consider when choosing floor plan software:
- Ease of use: How easy is the software to learn and use? If you are new to floor plan creation, you may want to choose a program that is simple and easy to understand.
- Features: What features does the software offer? Consider the features that are important to you, such as the ability to create 3D floor plans, add furniture and fixtures, and export floor plans to different file formats.
- Cost: How much does the software cost? There are many free and paid software programs available. Choose a program that fits your budget.
- Support: What kind of support does the software offer? If you run into problems, you want to be sure that you have access to support resources.
By considering these factors, you can choose the right software for your floor plan creation needs.
Here are some of the most popular floor plan software programs:
- SketchUp: SketchUp is a popular 3D modeling software program that can be used to create floor plans, 3D models, and virtual walkthroughs. It is a relatively easy-to-use program that is suitable for both beginners and experienced users.
- AutoCAD Architecture: AutoCAD Architecture is a professional-grade software program that is designed for architects and other professionals. It offers a wide range of features and functionality, including the ability to create 2D and 3D floor plans, add furniture and fixtures, and generate construction documents.
- Chief Architect: Chief Architect is another professional-grade software program that is designed for architects and other professionals. It offers a wide range of features and functionality, including the ability to create 2D and 3D floor plans, add furniture and fixtures, and generate construction documents.
- Floorplanner: Floorplanner is a cloud-based software program that allows you to create floor plans online. It is a relatively easy-to-use program that is suitable for both beginners and experienced users.
- SmartDraw: SmartDraw is a general-purpose diagramming software program that can be used to create floor plans, as well as other types of diagrams. It is a relatively easy-to-use program that is suitable for both beginners and experienced users.


Related Posts