A floor plan is a drawing that shows the layout of a room or building. It typically includes walls, windows, doors, and other permanent fixtures. Floor plans can be used for a variety of purposes, such as planning renovations, designing furniture arrangements, or simply understanding the layout of a space.
Many different software programs and websites allow you to create free floor plans. These programs typically provide a library of symbols that you can drag and drop into your plan. You can also add your own measurements and annotations to the plan. Once you have created a floor plan, you can share it with others or print it out.
In this article, we will show you how to create a free floor plan using one of several popular software programs. We will also provide some tips on how to use floor plans effectively.
When creating a free floor plan, there are a few important points to keep in mind:
- Use accurate measurements.
- Include all walls, windows, and doors.
- Add furniture and fixtures.
- Use a consistent scale.
- Label all rooms and spaces.
- Use a professional-looking template.
- Export your plan in a variety of formats.
- Share your plan with others.
By following these tips, you can create a free floor plan that is both accurate and informative.
Use accurate measurements.
One of the most important aspects of creating a free floor plan is to use accurate measurements. This will ensure that your plan is to scale and that it accurately reflects the layout of your space.
To measure your space, you will need a tape measure or laser measuring device. Start by measuring the length and width of each room. Then, measure the distance between walls, windows, and doors. Be sure to note the location of any other fixtures or features in the room, such as fireplaces, built-in shelves, or kitchen appliances.
Once you have all of your measurements, you can begin creating your floor plan. Be sure to use a consistent scale so that your plan is easy to read and understand.
Using accurate measurements will help you to create a floor plan that is both accurate and informative. This will be helpful for planning renovations, designing furniture arrangements, or simply understanding the layout of your space.
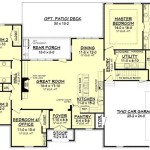
Include all walls, windows, and doors.
When creating a free floor plan, it is important to include all walls, windows, and doors. This will help to ensure that your plan is accurate and easy to understand.
- Walls: Walls are the most important part of any floor plan. They define the shape and size of each room, and they provide support for the roof and other structural elements. When drawing walls, be sure to include the thickness of the walls. This will help to make your plan more realistic and accurate.
- Windows: Windows are openings in walls that allow light and air to enter a room. When drawing windows, be sure to include the size and location of the windows. You should also indicate whether the windows are operable or fixed.
- Doors: Doors are openings in walls that allow people to enter and exit a room. When drawing doors, be sure to include the size and location of the doors. You should also indicate whether the doors are hinged, sliding, or folding.
- Other openings: In addition to windows and doors, there may be other openings in walls, such as archways, fireplaces, or built-in shelves. Be sure to include these openings in your floor plan, as they can affect the flow of traffic and the overall layout of the space.
By including all walls, windows, and doors in your free floor plan, you will create a more accurate and informative plan that will be helpful for planning renovations, designing furniture arrangements, or simply understanding the layout of your space.
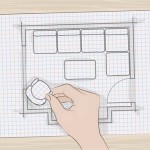
Add furniture and fixtures.
Once you have added all of the walls, windows, and doors to your free floor plan, you can begin adding furniture and fixtures. This will help to give your plan a more realistic and lived-in look.
- Furniture: Furniture is any item that is used to furnish a room, such as chairs, tables, beds, and sofas. When adding furniture to your floor plan, be sure to include the size and location of each piece of furniture. You should also indicate whether the furniture is fixed or movable.
- Fixtures: Fixtures are items that are attached to a wall or ceiling, such as light fixtures, ceiling fans, and built-in shelves. When adding fixtures to your floor plan, be sure to include the size and location of each fixture. You should also indicate whether the fixtures are functional or decorative.
- Appliances: Appliances are electrical devices that are used in a home, such as refrigerators, stoves, and dishwashers. When adding appliances to your floor plan, be sure to include the size and location of each appliance. You should also indicate whether the appliances are freestanding or built-in.
- Other items: In addition to furniture, fixtures, and appliances, you may also want to add other items to your floor plan, such as rugs, curtains, and artwork. These items can help to add personality and style to your plan.
By adding furniture and fixtures to your free floor plan, you will create a more realistic and informative plan that will be helpful for planning renovations, designing furniture arrangements, or simply understanding the layout of your space.
Use a consistent scale.
When creating a free floor plan, it is important to use a consistent scale. This means that all of the measurements in your plan should be based on the same unit of measurement, such as inches, feet, or meters. Using a consistent scale will help to ensure that your plan is accurate and easy to understand.
- Benefits of using a consistent scale:
There are several benefits to using a consistent scale when creating a floor plan. First, it will help to ensure that your plan is accurate. Second, it will make your plan easier to understand. Third, it will allow you to compare different floor plans more easily.
- How to choose a scale:
When choosing a scale for your floor plan, it is important to consider the size of your space and the level of detail that you want to include in your plan. If you are creating a plan of a small space, such as a single room, you may want to use a scale of 1:12 or 1:24. This will allow you to include more detail in your plan.
If you are creating a plan of a larger space, such as an entire house, you may want to use a scale of 1:50 or 1:100. This will allow you to create a more general plan that shows the overall layout of the space.
- Tips for using a consistent scale:
Once you have chosen a scale, it is important to use it consistently throughout your floor plan. This means that all of the measurements in your plan should be based on the same unit of measurement. You should also use the same scale when drawing walls, windows, and doors.
- Consequences of not using a consistent scale:
If you do not use a consistent scale when creating a floor plan, your plan may be inaccurate and difficult to understand. This can lead to problems when planning renovations, designing furniture arrangements, or simply understanding the layout of your space.
By using a consistent scale when creating a free floor plan, you can create an accurate and informative plan that will be helpful for planning renovations, designing furniture arrangements, or simply understanding the layout of your space.
Label all rooms and spaces.
Once you have added all of the walls, windows, and doors to your free floor plan, you should label all of the rooms and spaces. This will help to identify the different areas of your space and make your plan more informative.
- Benefits of labeling rooms and spaces:
There are several benefits to labeling rooms and spaces on your floor plan. First, it will help to identify the different areas of your space. This can be helpful when planning renovations, designing furniture arrangements, or simply understanding the layout of your space.
Second, labeling rooms and spaces can help to make your plan more informative. By providing labels, you can easily identify the function of each room or space. This can be helpful for others who are viewing your plan, such as contractors, designers, or potential buyers.
- How to label rooms and spaces:
When labeling rooms and spaces on your floor plan, it is important to use clear and concise labels. You should also use a consistent font and size for all of the labels. This will help to make your plan easy to read and understand.
Some common ways to label rooms and spaces include using the name of the room (e.g., “bedroom”), the function of the room (e.g., “kitchen”), or the type of space (e.g., “closet”). You can also use a combination of these methods to create labels that are both clear and informative.
- Tips for labeling rooms and spaces:
Here are a few tips for labeling rooms and spaces on your floor plan:
- Use clear and concise labels.
- Use a consistent font and size for all of the labels.
- Label all of the rooms and spaces on your plan.
- Use a combination of methods to create labels that are both clear and informative.
- Consequences of not labeling rooms and spaces:
If you do not label the rooms and spaces on your floor plan, your plan may be difficult to understand. This can lead to problems when planning renovations, designing furniture arrangements, or simply understanding the layout of your space.
By labeling all of the rooms and spaces on your free floor plan, you can create a more informative and useful plan that will be helpful for planning renovations, designing furniture arrangements, or simply understanding the layout of your space.
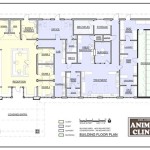
Use a professional-looking template.
When creating a free floor plan, it is important to use a professional-looking template. This will help to ensure that your plan is visually appealing and easy to understand. There are many different free floor plan templates available online. You can find templates that are designed for different types of spaces, such as homes, offices, and retail stores. You can also find templates that are designed for different purposes, such as planning renovations, designing furniture arrangements, or simply understanding the layout of a space.
When choosing a free floor plan template, it is important to consider the following factors:
- The type of space: Choose a template that is designed for the type of space that you are planning. For example, if you are planning a home, choose a template that is designed for homes.
- The purpose of the plan: Choose a template that is designed for the purpose that you need. For example, if you are planning a renovation, choose a template that is designed for planning renovations.
- The level of detail: Choose a template that includes the level of detail that you need. For example, if you need a detailed plan, choose a template that includes all of the walls, windows, and doors.
- The visual appeal: Choose a template that is visually appealing to you. This will help to motivate you to create a plan that is both accurate and informative.
Once you have chosen a free floor plan template, you can begin creating your plan. Be sure to use accurate measurements and label all of the rooms and spaces. You should also add furniture and fixtures to your plan. By following these tips, you can create a professional-looking free floor plan that will be helpful for planning renovations, designing furniture arrangements, or simply understanding the layout of your space.
Here are some additional tips for using a professional-looking template:
- Use a consistent scale throughout your plan.
- Use clear and concise labels.
- Use a variety of line weights and colors to distinguish between different elements of your plan.
- Add a legend to your plan to explain the different symbols and notations that you have used.
- Export your plan in a high-quality format, such as PDF or PNG.
By following these tips, you can create a professional-looking free floor plan that will be both accurate and informative.
Export your plan in a variety of formats.
Once you have created your free floor plan, you should export it in a variety of formats. This will allow you to share your plan with others and use it for different purposes.
- PDF: PDF is a popular file format that is supported by most computers and devices. PDF files are portable, which means that they can be easily shared and viewed on different platforms. PDF files can also be printed at high quality.
- PNG: PNG is a raster image file format that is supported by most computers and devices. PNG files are lossless, which means that they do not lose any quality when they are compressed. PNG files are also relatively small in size, which makes them easy to share and store.
- DXF: DXF is a CAD file format that is supported by most CAD software programs. DXF files can be used to create detailed floor plans that can be used for construction or renovation projects.
- SVG: SVG is a vector image file format that is supported by most web browsers. SVG files are scalable, which means that they can be resized without losing any quality. SVG files are also relatively small in size, which makes them easy to share and store.
By exporting your free floor plan in a variety of formats, you can ensure that you can share your plan with others and use it for different purposes. This will help you to get the most out of your floor plan.
Share your plan with others.
Once you have created your free floor plan, you may want to share it with others. There are many reasons why you might want to share your plan. For example, you may want to share your plan with a contractor or designer if you are planning a renovation or addition. You may also want to share your plan with family and friends so that they can see the layout of your home or office.
- Collaborate with others:
If you are working on a project with others, you can share your floor plan with them so that they can provide feedback and input. This can be helpful if you are planning a renovation or addition, or if you are simply trying to get ideas for how to improve the layout of your space.
- Get feedback from experts:
If you are not sure about the layout of your space, you can share your floor plan with a contractor or designer for feedback. They can provide you with professional advice and help you to create a plan that meets your needs.
- Show off your design skills:
If you are proud of your floor plan, you can share it with others to show off your design skills. This can be a great way to get recognition for your work and to inspire others.
- Sell or rent your property:
If you are selling or renting your property, you can include your floor plan in the listing. This can help potential buyers or tenants to visualize the layout of your space and make an informed decision about whether or not to purchase or rent your property.
There are many different ways to share your free floor plan with others. You can share your plan online, via email, or in person. You can also print your plan and give it to others. No matter how you choose to share your plan, make sure that you provide a clear and concise explanation of the plan and its purpose.


Related Posts