Draw floor plans are technical drawings that depict the layout and dimensions of a building or room. They are used for various purposes, including architecture, interior design, and property management. Floor plans provide a detailed representation of the space’s size, shape, and the arrangement of walls, doors, windows, and fixtures. For example, in the planning of a new home, floor plans help architects create a functional and aesthetically pleasing layout that meets the needs of the homeowners.
Drawing floor plans involves using specific symbols and notations to represent different building elements. The process requires precision and attention to detail to ensure the accuracy of the drawing. Architects and designers often use computer-aided design (CAD) software to create floor plans, as it allows for greater flexibility and the ability to easily make revisions.
Drawing floor plans involves several important considerations to ensure accuracy and clarity:
- Use precise measurements
- Follow scale conventions
- Represent walls and openings clearly
- Include dimensions and annotations
- Use appropriate symbols and line weights
- Consider furniture placement
- Pay attention to lighting and ventilation
- Create multiple views if necessary
- Use CAD software for accuracy and flexibility
By adhering to these guidelines, you can create informative and visually appealing floor plans that effectively convey the layout and design of a space.
Use precise measurements
Accuracy is paramount when drawing floor plans. Precise measurements ensure that the plan accurately reflects the dimensions of the space and that all elements are correctly positioned. This is particularly important for construction purposes, as inaccurate measurements can lead to costly errors during the building process.
- Measure walls and openings accurately
Use a tape measure to carefully measure the length and height of all walls, as well as the width of doors and windows. Note any variations in wall thickness or the presence of alcoves or recesses.
- Establish a consistent scale
Choose a scale that allows you to fit the entire floor plan onto the drawing paper or digital canvas while maintaining clarity. The scale should be large enough to show all the necessary details without overcrowding the plan.
- Use a measuring device that aligns with the scale
If using a physical measuring tape, ensure it has the appropriate scale markings. For digital drawings, use the measurement tools in your CAD software to ensure accurate scaling.
- Double-check measurements
Once you have taken all the measurements, double-check them for accuracy. This is especially important for critical dimensions, such as the overall size of the room or the placement of load-bearing walls.
By following these guidelines, you can ensure the precision of your floor plan measurements, which is essential for creating an accurate and reliable representation of the space.
Follow scale conventions
When drawing floor plans, it is essential to adhere to scale conventions to ensure that the plan accurately reflects the dimensions and proportions of the space. Scale conventions establish a consistent relationship between the size of the drawing and the actual size of the space it represents.
- Choose an appropriate scale
The scale of a floor plan should be chosen based on the size and complexity of the space being represented. Common scales used for floor plans include 1:50, 1:100, and 1:200. A scale of 1:50 means that one unit on the drawing represents 50 units in real life. For smaller spaces, such as a single room or apartment, a larger scale (e.g., 1:50 or 1:100) may be more appropriate. For larger spaces, such as a house or commercial building, a smaller scale (e.g., 1:200) may be necessary to fit the entire plan onto the drawing.
- Use a scale bar
A scale bar is a graphic element that indicates the relationship between the drawing and the actual space. It is typically placed on the floor plan and shows the distance represented by a specific length on the drawing. For example, a scale bar might indicate that 1 inch on the drawing represents 5 feet in real life. This allows viewers to easily determine the actual dimensions of the space from the floor plan.
- Maintain consistent scaling throughout the plan
It is important to maintain consistent scaling throughout the floor plan. This means that all elements of the plan, including walls, doors, windows, and furniture, should be drawn to the same scale. Inconsistent scaling can lead to confusion and inaccuracies in the plan.
- Consider the purpose of the floor plan
The purpose of the floor plan should also be considered when choosing a scale. For example, a floor plan intended for construction purposes may require a more precise scale (e.g., 1:50 or 1:100) to ensure accurate measurements. On the other hand, a floor plan intended for marketing purposes may use a less precise scale (e.g., 1:200) to provide a general overview of the space.
By following these guidelines, you can ensure that your floor plans are drawn to scale and accurately represent the dimensions and proportions of the space they represent.
Represent walls and openings clearly
Clearly representing walls and openings in a floor plan is crucial for conveying the layout and structure of a space. Walls define the boundaries of rooms and spaces, while openings, such as doors and windows, provide access and natural light. Here are some key points to consider when representing walls and openings in a floor plan:
- Use appropriate line weights
Walls should be represented using a heavier line weight than other elements in the floor plan, such as furniture or fixtures. This helps to visually distinguish walls and make them easily identifiable. Openings, such as doors and windows, can be represented using a lighter line weight.
- Show wall thickness
The thickness of walls can vary depending on the type of construction and the purpose of the wall. In a floor plan, it is important to indicate the thickness of walls to provide a more accurate representation of the space. This can be done by drawing two parallel lines to represent the inner and outer edges of the wall.
- Indicate door swing
Doors should be represented in a way that shows the direction in which they swing. This can be indicated by drawing a small arc or line to represent the door’s swing radius.
- Use different symbols for different types of openings
Different symbols can be used to represent different types of openings in a floor plan. For example, a simple rectangle can be used to represent a door, while a circle or square can be used to represent a window. Using consistent symbols helps to make the floor plan easier to read and understand.
By following these guidelines, you can clearly represent walls and openings in a floor plan, which will help to convey the layout and structure of the space effectively.
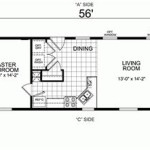
Include dimensions and annotations
Dimensions and annotations are essential elements of a floor plan as they provide critical information about the size, shape, and layout of a space. Dimensions indicate the length, width, and height of rooms and other spaces, while annotations provide additional information, such as the location of specific features or the purpose of a particular area.
- Add overall dimensions
The overall dimensions of the floor plan should be indicated to provide a quick reference for the total size of the space. This can be done by drawing a rectangle around the perimeter of the plan and labeling the length and width.
- Include room dimensions
Each room or space within the floor plan should have its dimensions labeled. This helps to convey the relative size and proportions of different spaces.
- Annotate key features
Important features within the floor plan, such as doors, windows, stairs, and built-in fixtures, should be annotated to provide additional information. For example, a door annotation might include the type of door (e.g., hinged, sliding) and its dimensions, while a window annotation might include the type of window (e.g., casement, double-hung) and its dimensions.
- Label spaces and areas
Different spaces and areas within the floor plan, such as the kitchen, living room, or master bedroom, should be labeled to provide clarity and ease of understanding. This helps to identify the function and purpose of each space.
By including dimensions and annotations in your floor plans, you can provide a more informative and comprehensive representation of the space, making it easier for others to understand the layout and design.
Use appropriate symbols and line weights
When drawing floor plans, it is important to use appropriate symbols and line weights to convey the different elements of the plan clearly and accurately. Symbols are used to represent specific features and fixtures within the space, while line weights help to differentiate between different types of elements.
Symbols
There is a wide range of symbols that can be used in floor plans to represent different elements, such as walls, doors, windows, furniture, and fixtures. Each symbol should be chosen carefully to ensure that it is easily recognizable and unambiguous. For example, a rectangle is commonly used to represent a wall, while a circle or square is used to represent a window. Using consistent symbols throughout the floor plan helps to make it easier to read and understand.
Line weights
Line weights are used to differentiate between different types of elements in a floor plan. For example, thicker lines are often used to represent walls, while thinner lines are used to represent furniture and fixtures. This helps to create a visual hierarchy and make it easier to distinguish between different elements of the plan. Additionally, line weights can be used to indicate the relative importance of different elements. For example, a thicker line might be used to highlight a load-bearing wall or a main entrance.
Consider furniture placement
When drawing floor plans, it is important to consider the placement of furniture to ensure that the space is both functional and aesthetically pleasing. Furniture placement can have a significant impact on the overall flow and feel of a room, and it is important to take into account the size, shape, and function of the space when arranging furniture.
One of the first things to consider when placing furniture is the traffic flow within the space. Furniture should be arranged in a way that allows people to move around easily without feeling cramped or obstructed. It is also important to consider the placement of furniture in relation to windows and doors to ensure that there is no blocking of natural light or access to the outdoors.
Another important factor to consider is the size and shape of the furniture in relation to the size and shape of the room. Overcrowding a small space with large furniture can make the room feel cramped and uncomfortable, while placing small furniture in a large space can make the room feel empty and impersonal. It is important to choose furniture that is appropriately sized for the space and that will create a sense of balance and harmony.
Finally, it is important to consider the function of the space when placing furniture. For example, in a living room, furniture should be arranged in a way that encourages conversation and relaxation. In a bedroom, furniture should be placed in a way that creates a restful and inviting atmosphere. By considering the function of the space, you can create a floor plan that is both functional and aesthetically pleasing.
Paragraph after details
In addition to the factors discussed above, there are a few other things to keep in mind when considering furniture placement. First, it is important to think about the overall style of the space and how the furniture will complement the dcor. Second, it is important to consider the personal preferences of the people who will be using the space. Finally, it is important to be flexible and willing to experiment with different furniture arrangements until you find one that works well for you.
Pay attention to lighting and ventilation
Lighting and ventilation are two important factors to consider when drawing floor plans. Natural light can help to create a brighter, more inviting space, while proper ventilation can help to improve air quality and reduce the risk of moisture problems. When planning a floor plan, it is important to take into account the following:
- Window placement
Windows should be placed to maximize natural light and provide views to the outdoors. Consider the orientation of the building and the path of the sun to determine the best placement for windows. - Artificial lighting
In addition to natural light, artificial lighting is also necessary to provide adequate illumination throughout the space. Plan for a combination of general lighting, task lighting, and accent lighting to create a well-lit and visually appealing environment. - Ventilation
Proper ventilation is essential for maintaining good air quality and preventing moisture problems. Plan for a combination of natural ventilation (e.g., windows and doors) and mechanical ventilation (e.g., fans and ducts) to ensure that the space is well-ventilated. - Cross-ventilation
Cross-ventilation is a technique that involves placing windows and doors on opposite sides of a room to create a flow of air. This helps to ventilate the space and reduce the risk of moisture problems.
By considering lighting and ventilation when drawing floor plans, you can create spaces that are both comfortable and healthy.
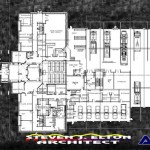
Create multiple views if necessary
In some cases, it may be necessary to create multiple views of a floor plan to fully convey the layout and design of a space. This is especially true for complex spaces or spaces with multiple levels. Different views can provide different perspectives and highlight different aspects of the plan.
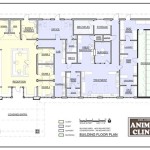
- Plan view
A plan view is a view of the floor plan from above, as if looking down on the space from a bird’s-eye perspective. This view shows the overall layout of the space, including the placement of walls, doors, windows, and other features. Plan views are typically drawn to scale and can be used to determine the dimensions and proportions of the space.
- Section view
A section view is a view of the floor plan from the side, as if cutting through the space to reveal the interior. This view shows the vertical relationships between different elements of the space, such as the height of walls, the location of stairs, and the placement of windows. Section views can be used to illustrate the three-dimensional nature of a space and to show how different elements of the plan fit together.
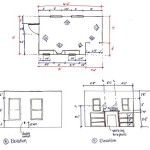
- Elevation view
An elevation view is a view of the floor plan from the front, back, or side, as if looking at the exterior of the building. This view shows the overall shape and form of the building, as well as the placement of windows, doors, and other features. Elevation views can be used to illustrate the architectural style of a building and to show how it will look from different angles.
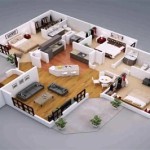
- Isometric view
An isometric view is a three-dimensional view of the floor plan that shows the space from a slightly tilted perspective. This view can be used to provide a more realistic representation of the space and to show how different elements of the plan relate to each other. Isometric views can be helpful for visualizing the space and for understanding the overall design.
By creating multiple views of a floor plan, you can provide a more comprehensive and informative representation of the space. This can be helpful for both design and construction purposes.
Use CAD software for accuracy and flexibility
Computer-aided design (CAD) software is a powerful tool that can be used to create accurate and detailed floor plans. CAD software provides a number of advantages over traditional manual drafting methods, including:
- Accuracy
CAD software allows you to create precise and accurate floor plans. The software uses mathematical equations to calculate the dimensions and proportions of all elements in the plan, ensuring that the plan is accurate and to scale.
- Flexibility
CAD software is very flexible and allows you to easily make changes to your floor plans. You can add, delete, or modify any element of the plan with just a few clicks of the mouse. This makes it easy to experiment with different design options and to make changes as needed.
- Efficiency
CAD software can help you to create floor plans more quickly and efficiently than manual drafting methods. The software can automate many of the tasks involved in creating a floor plan, such as drawing walls, doors, and windows. This can save you a significant amount of time and effort.
- Collaboration
CAD software makes it easy to collaborate with other professionals on your floor plans. You can share your plans with others electronically, and they can make changes and comments using the software’s built-in collaboration tools. This makes it easy to work together on complex projects and to ensure that everyone is on the same page.
Paragraph after details
Overall, CAD software is a valuable tool for anyone who needs to create accurate and detailed floor plans. The software’s accuracy, flexibility, efficiency, and collaboration features make it an essential tool for architects, engineers, interior designers, and other professionals.


Related Posts