Creating a floor plan in Excel is a valuable skill for architects, interior designers, and homeowners alike. It allows you to visualize and plan the layout of a space, whether it’s a room, an entire house, or even a commercial building.
Floor plans are essential for planning furniture placement, electrical and plumbing fixtures, and ensuring the space meets building codes. They can also be used to communicate design ideas to clients, contractors, or other stakeholders.
In this article, we’ll guide you through the steps of creating a floor plan in Excel, from importing a template to adding walls, windows, and doors. We’ll also cover how to customize the appearance of your floor plan and export it to different formats.
Here are 8 important points about how to make a floor plan in Excel:
- Choose the right template
- Create walls and rooms
- Add windows and doors
- Insert furniture and fixtures
- Customize the appearance
- Add dimensions and labels
- Export to different formats
- Use Excel’s built-in tools
By following these steps, you can create a professional-looking floor plan in Excel that will help you visualize and plan your space.
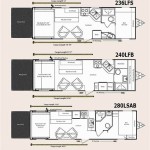
Choose the right template
The first step in creating a floor plan in Excel is to choose the right template. There are many different templates available online, both free and paid. Some templates are designed for specific types of spaces, such as houses, apartments, or offices. Others are more general-purpose.
When choosing a template, consider the following factors:
- The size and complexity of your space. If you have a large or complex space, you will need a template that is designed for that type of space. A simple template may not be able to accommodate all of the details of your space.
- The level of detail you need. Some templates include a lot of detail, such as furniture and fixtures. Others are more basic and only include the walls and windows. Choose a template that has the level of detail you need.
- The style of your space. Some templates have a modern style, while others have a more traditional style. Choose a template that matches the style of your space.
Once you have considered these factors, you can start browsing for templates. There are many websites that offer free and paid floor plan templates. Once you have found a template that you like, download it and open it in Excel.
Create walls and rooms
Once you have chosen a template, you can start creating the walls and rooms of your floor plan. To do this, you will use the “Insert” tab in the Excel ribbon.
- Insert a wall: Click on the “Shapes” button in the “Insert” tab. Then, select the “Line” shape. Click and drag to draw a wall on your floor plan. You can adjust the length and angle of the wall by dragging the small squares on the ends of the line.
- Create a room: To create a room, simply draw four walls around the space. Make sure that the walls are connected at the corners. You can then fill in the room with a color or pattern.
- Add windows and doors: Once you have created your walls and rooms, you can add windows and doors. To do this, click on the “Shapes” button in the “Insert” tab and select the “Rectangle” shape. Click and drag to draw a window or door on your floor plan. You can then adjust the size and shape of the window or door by dragging the small squares on the sides and corners.
- Label the rooms: Once you have created your floor plan, you can label the rooms. To do this, click on the “Insert” tab and select the “Text Box” shape. Click and drag to draw a text box on your floor plan. You can then type in the name of the room.
By following these steps, you can create a basic floor plan in Excel. You can then customize the appearance of your floor plan by adding furniture, fixtures, and other details.
Add windows and doors
Once you have created your walls and rooms, you can add windows and doors. To do this, click on the “Shapes” button in the “Insert” tab and select the “Rectangle” shape. Click and drag to draw a window or door on your floor plan. You can then adjust the size and shape of the window or door by dragging the small squares on the sides and corners.
When adding windows and doors, it is important to consider the following factors:
- The size and shape of the window or door. The size and shape of the window or door will depend on the type of space you are creating. For example, a living room will typically have larger windows than a bathroom. A door should be large enough to allow people to enter and exit the room easily.
- The location of the window or door. The location of the window or door will depend on the layout of your space and the amount of natural light you want to let in. Windows are typically placed on exterior walls, while doors can be placed on either interior or exterior walls.
- The style of the window or door. The style of the window or door should match the style of your space. For example, a modern space will typically have modern windows and doors, while a traditional space will typically have traditional windows and doors.
Once you have considered these factors, you can start adding windows and doors to your floor plan. To add a window, simply draw a rectangle on the wall where you want the window to be. To add a door, draw a rectangle on the wall where you want the door to be. You can then adjust the size and shape of the window or door by dragging the small squares on the sides and corners.
By following these steps, you can add windows and doors to your floor plan in Excel. You can then customize the appearance of your windows and doors by adding frames, moldings, and other details.
Paragraph after details:
In addition to the basic steps outlined above, there are a few other things you can do to add windows and doors to your floor plan in Excel:
- Use the “Format Shape” pane to customize the appearance of your windows and doors. You can change the color, fill, and line style of your windows and doors to match the style of your space.
- Add multiple windows and doors to a single wall. To do this, simply draw multiple rectangles on the wall where you want the windows or doors to be. You can then adjust the size and shape of each window or door individually.
- Create custom window and door shapes. If you want to create a window or door with a custom shape, you can use the “Draw Custom Shape” tool in the “Shapes” menu. This tool allows you to draw any shape you want, which can be useful for creating unique or stylized windows and doors.
By following these tips, you can add windows and doors to your floor plan in Excel that are both functional and stylish.
Insert furniture and fixtures
Once you have created your walls, rooms, and windows, you can start adding furniture and fixtures to your floor plan. To do this, you can use the “Shapes” button in the “Insert” tab. Click on the “Shapes” button and select the shape that you want to use for your furniture or fixture. You can then click and drag to draw the shape on your floor plan.
When adding furniture and fixtures, it is important to consider the following factors:
- The size and shape of the furniture or fixture. The size and shape of the furniture or fixture will depend on the type of space you are creating. For example, a living room will typically have larger furniture than a bathroom. A fixture, such as a sink or toilet, will typically have a specific size and shape.
- The location of the furniture or fixture. The location of the furniture or fixture will depend on the layout of your space and how you want to use the space. For example, a sofa is typically placed in the center of a living room, while a bed is typically placed in the center of a bedroom.
- The style of the furniture or fixture. The style of the furniture or fixture should match the style of your space. For example, a modern space will typically have modern furniture and fixtures, while a traditional space will typically have traditional furniture and fixtures.
Once you have considered these factors, you can start adding furniture and fixtures to your floor plan. To add furniture, simply draw the shape of the furniture on your floor plan. To add a fixture, draw the shape of the fixture on your floor plan. You can then adjust the size and shape of the furniture or fixture by dragging the small squares on the sides and corners.
By following these steps, you can add furniture and fixtures to your floor plan in Excel. You can then customize the appearance of your furniture and fixtures by adding colors, patterns, and other details.
In addition to the basic steps outlined above, there are a few other things you can do to add furniture and fixtures to your floor plan in Excel:
- Use the “Format Shape” pane to customize the appearance of your furniture and fixtures. You can change the color, fill, and line style of your furniture and fixtures to match the style of your space.
- Add multiple pieces of furniture or fixtures to a single room. To do this, simply draw multiple shapes on the floor plan where you want the furniture or fixtures to be. You can then adjust the size and shape of each piece of furniture or fixture individually.
- Create custom furniture and fixture shapes. If you want to create a piece of furniture or fixture with a custom shape, you can use the “Draw Custom Shape” tool in the “Shapes” menu. This tool allows you to draw any shape you want, which can be useful for creating unique or stylized furniture and fixtures.
By following these tips, you can add furniture and fixtures to your floor plan in Excel that are both functional and stylish.
Customize the appearance
Once you have added all of the elements to your floor plan, you can customize the appearance to match your style. To do this, you can use the “Format” tab in the Excel ribbon.
The “Format” tab contains a variety of options that you can use to customize the appearance of your floor plan, including:
- Fill color: You can change the fill color of any shape in your floor plan. To do this, select the shape and then click on the “Fill Color” button in the “Format” tab. You can then choose a color from the palette or enter a custom color code.
- Line color: You can change the line color of any shape in your floor plan. To do this, select the shape and then click on the “Line Color” button in the “Format” tab. You can then choose a color from the palette or enter a custom color code.
- Line style: You can change the line style of any shape in your floor plan. To do this, select the shape and then click on the “Line Style” button in the “Format” tab. You can then choose a line style from the drop-down menu.
- Line weight: You can change the line weight of any shape in your floor plan. To do this, select the shape and then click on the “Line Weight” button in the “Format” tab. You can then choose a line weight from the drop-down menu.
By using the options in the “Format” tab, you can customize the appearance of your floor plan to match your style. For example, you can use different colors and line styles to create a floor plan that is both functional and visually appealing.
In addition to the basic formatting options described above, there are a few other things you can do to customize the appearance of your floor plan in Excel:
- Add images: You can add images to your floor plan to make it more visually appealing. To do this, click on the “Insert” tab and then click on the “Picture” button. You can then browse to and select the image you want to add. Once you have added the image, you can resize and position it as needed.
- Add text: You can add text to your floor plan to label rooms, add notes, or provide other information. To do this, click on the “Insert” tab and then click on the “Text Box” button. You can then click and drag to draw a text box on your floor plan. You can then type in the text you want to add.
- Create custom shapes: If you want to create a shape that is not available in the “Shapes” menu, you can create a custom shape. To do this, click on the “Insert” tab and then click on the “Shapes” button. Then, click on the “New Shape” button and select “Custom Shape.” You can then draw the shape you want to create. Once you have created the shape, you can add it to your floor plan.
By following these tips, you can customize the appearance of your floor plan in Excel to create a visually appealing and informative document.
Add dimensions and labels
Once you have customized the appearance of your floor plan, you can add dimensions and labels to make it more informative. To do this, you can use the “Insert” tab in the Excel ribbon.
To add a dimension, click on the “Insert” tab and then click on the “Shapes” button. Then, select the “Line” shape. Click and drag to draw a line on your floor plan. To add a label, click on the “Insert” tab and then click on the “Text Box” button. Click and drag to draw a text box on your floor plan. You can then type in the dimension or label.
When adding dimensions and labels, it is important to consider the following factors:
- The size and placement of the dimension or label. The size and placement of the dimension or label will depend on the size of your floor plan and the amount of space you have available. You want to make sure that the dimension or label is large enough to be easily read, but not so large that it takes up too much space.
- The style of the dimension or label. The style of the dimension or label should match the style of your floor plan. For example, a modern floor plan will typically have modern dimensions and labels, while a traditional floor plan will typically have traditional dimensions and labels.
By following these steps, you can add dimensions and labels to your floor plan in Excel. This will make your floor plan more informative and easier to understand.
In addition to the basic steps outlined above, there are a few other things you can do to add dimensions and labels to your floor plan in Excel:
- Use the “Format Shape” pane to customize the appearance of your dimensions and labels. You can change the color, fill, and line style of your dimensions and labels to match the style of your floor plan.
- Add multiple dimensions and labels to a single wall or room. To do this, simply draw multiple lines or text boxes on the wall or room where you want the dimensions or labels to be. You can then adjust the size and placement of each dimension or label individually.
- Create custom dimension and label shapes. If you want to create a dimension or label with a custom shape, you can use the “Draw Custom Shape” tool in the “Shapes” menu. This tool allows you to draw any shape you want, which can be useful for creating unique or stylized dimensions and labels.
By following these tips, you can add dimensions and labels to your floor plan in Excel that are both informative and stylish.
Export to different formats
Once you have finished creating your floor plan in Excel, you can export it to a variety of different formats. This allows you to share your floor plan with others, or to use it in other applications.
The most common file format for floor plans is PDF. PDF files are portable, meaning that they can be opened on any computer or device that has a PDF reader installed. PDF files are also relatively small in size, making them easy to share via email or other online methods.
Another popular file format for floor plans is DWG. DWG files are native to AutoCAD, a popular computer-aided design (CAD) software program. DWG files are typically used by architects and other professionals who need to create detailed floor plans.
In addition to PDF and DWG, you can also export your floor plan to a variety of other formats, including:
- JPG: JPG files are a common image format that can be opened on most computers and devices. JPG files are typically used for sharing images online or in presentations.
- PNG: PNG files are another common image format that can be opened on most computers and devices. PNG files are typically used for creating images with transparent backgrounds.
- SVG: SVG files are a vector image format that can be opened on most computers and devices. SVG files are typically used for creating images that can be scaled to any size without losing quality.
When exporting your floor plan, it is important to choose the right file format for your needs. If you need to share your floor plan with others, or if you need to use it in another application, then PDF or DWG is a good choice. If you need to create an image of your floor plan, then JPG, PNG, or SVG is a good choice.
In addition to the basic export options described above, there are a few other things you can do to export your floor plan in Excel:
- Export a selected area of your floor plan. To do this, select the area of your floor plan that you want to export and then click on the “Export” button in the “File” tab. In the “Export” dialog box, select the file format you want to export to and then click on the “Save” button.
- Export your floor plan to a specific scale. To do this, click on the “Page Setup” button in the “File” tab. In the “Page Setup” dialog box, select the “Scaling” tab and then enter the scale you want to export your floor plan to. Click on the “OK” button to save your changes.
- Export your floor plan with a watermark. To do this, click on the “Watermark” button in the “Design” tab. In the “Watermark” dialog box, select the watermark you want to use and then click on the “OK” button. Your watermark will be added to your floor plan when you export it.
By following these tips, you can export your floor plan in Excel to a variety of different formats and with a variety of different options. This gives you the flexibility to share your floor plan with others, or to use it in other applications, in the way that best meets your needs.
Use Excel’s built-in tools
Excel has a number of built-in tools that you can use to create a floor plan. These tools include the “Shapes” menu, the “Format” tab, and the “Insert” tab.
The “Shapes” menu contains a variety of shapes that you can use to create the walls, rooms, windows, and doors of your floor plan. To add a shape to your floor plan, simply click on the shape you want to use and then click and drag on the floor plan to draw the shape.
The “Format” tab contains a variety of options that you can use to customize the appearance of your floor plan. You can use the “Format” tab to change the color, fill, and line style of any shape in your floor plan. You can also use the “Format” tab to add text to your floor plan.
The “Insert” tab contains a variety of tools that you can use to add additional elements to your floor plan. You can use the “Insert” tab to add images, charts, and other objects to your floor plan. You can also use the “Insert” tab to add dimensions and labels to your floor plan.
In addition to the basic tools described above, Excel also has a number of advanced tools that you can use to create more complex floor plans. These tools include the “Drawing Tools” toolbar and the “3D Modeling” tools.
The “Drawing Tools” toolbar contains a variety of tools that you can use to create custom shapes and lines. You can use the “Drawing Tools” toolbar to create curved walls, angled walls, and other complex shapes. You can also use the “Drawing Tools” toolbar to add arrows, callouts, and other annotations to your floor plan.
The “3D Modeling” tools allow you to create 3D models of your floor plan. This can be useful for visualizing your floor plan in a more realistic way. You can use the “3D Modeling” tools to create walls, floors, ceilings, and other objects. You can also use the “3D Modeling” tools to add lighting and shadows to your floor plan.
By using Excel’s built-in tools, you can create a variety of different floor plans, from simple to complex. Excel’s tools are easy to use and allow you to create professional-looking floor plans quickly and easily.


Related Posts