A floor plan is a drawing that shows the layout of a building. It can be used to show the arrangement of rooms, doors, windows, and other features. Floor plans are used by architects, builders, and interior designers to plan and construct buildings. They can also be used by homeowners to visualize the layout of their homes and to make changes.
One of the most important uses of a floor plan is to show the layout of rooms. This can be useful for planning furniture placement, traffic flow, and the overall function of a space. Floor plans can also be used to show the location of doors and windows, which can be important for security and privacy. Additionally, floor plans can show the location of plumbing fixtures, electrical outlets, and other features, which can be useful for planning renovations or repairs.
In the next section, we will discuss the different types of floor plans and how they are used.
When drawing a floor plan, there are a few important points to keep in mind:
- Use a consistent scale.
- Draw walls and partitions accurately.
- Include all doors and windows.
- Show the location of plumbing fixtures.
- Indicate the direction of north.
- Label all rooms and spaces.
- Add furniture and other details.
- Create a legend to explain any symbols.
By following these tips, you can create a clear and accurate floor plan that will be useful for your project.
Use a consistent scale.
When drawing a floor plan, it is important to use a consistent scale. This means that all of the measurements on your plan are drawn to the same scale. For example, if you are using a scale of 1/4 inch = 1 foot, then all of the measurements on your plan should be drawn at that scale. Using a consistent scale will help to ensure that your floor plan is accurate and easy to read.
There are a few different ways to measure and draw a floor plan to scale. One way is to use a measuring tape and a ruler. Another way is to use a CAD program. If you are using a CAD program, be sure to set the scale of the drawing before you start drawing.
Once you have chosen a scale, be sure to stick to it throughout the entire drawing. Do not change the scale in the middle of the drawing, as this will make your floor plan inaccurate. If you need to change the scale, start a new drawing.
Using a consistent scale is an important part of drawing a floor plan. By following this tip, you can create a clear and accurate floor plan that will be useful for your project.
Draw walls and partitions accurately.
When drawing walls and partitions, it is important to be accurate. This means that the walls and partitions should be drawn to the correct scale and that they should be in the correct location. Inaccurate walls and partitions can make it difficult to read and understand the floor plan, and they can also lead to errors in construction.
There are a few things that you can do to ensure that your walls and partitions are accurate. First, be sure to measure the walls and partitions carefully. You can use a measuring tape or a laser measuring device to get accurate measurements. Second, be sure to draw the walls and partitions to scale. This means that the measurements on your plan should be the same as the actual measurements of the walls and partitions. Third, be sure to position the walls and partitions in the correct location. You can use a CAD program or a ruler and a protractor to help you position the walls and partitions accurately.
By following these tips, you can draw accurate walls and partitions that will make your floor plan clear and easy to read. In addition, accurate walls and partitions will help to ensure that your construction project is completed correctly.
Here are some additional tips for drawing walls and partitions accurately:
- Use a sharp pencil or pen to draw the walls and partitions. This will help to ensure that the lines are clean and precise.
- Be sure to label the walls and partitions with their correct names. This will help to identify the different spaces on the floor plan.
- If you are drawing a complex floor plan, it may be helpful to use a CAD program. CAD programs can help you to draw accurate walls and partitions, and they can also help you to create a scaled floor plan.
By following these tips, you can draw accurate walls and partitions that will make your floor plan clear and easy to read. In addition, accurate walls and partitions will help to ensure that your construction project is completed correctly.
Include all doors and windows.
When drawing a floor plan, it is important to include all of the doors and windows. This may seem like an obvious point, but it is often overlooked. Doors and windows are important because they allow people to move around the building and they also provide natural light and ventilation. Without doors and windows, a floor plan would be incomplete and difficult to use.
There are a few things to keep in mind when drawing doors and windows. First, be sure to draw them to the correct scale. This means that the doors and windows should be the same size on your plan as they are in the actual building. Second, be sure to position the doors and windows in the correct location. This means that the doors and windows should be in the same place on your plan as they are in the actual building.
In addition to drawing the doors and windows, you should also label them. This will help to identify the different doors and windows on the floor plan. You can label the doors and windows with their names, their numbers, or their functions. For example, you could label the front door as “Front Door” or “Door 1.” You could label the kitchen window as “Kitchen Window” or “Window 3.” Labeling the doors and windows will make your floor plan more clear and easy to read.
Here are some additional tips for drawing doors and windows:
- Use a sharp pencil or pen to draw the doors and windows. This will help to ensure that the lines are clean and precise.
- Be sure to draw the doors and windows to the correct scale. This means that the doors and windows should be the same size on your plan as they are in the actual building.
- Be sure to position the doors and windows in the correct location. This means that the doors and windows should be in the same place on your plan as they are in the actual building.
- Label the doors and windows with their names, their numbers, or their functions. This will help to identify the different doors and windows on the floor plan.
By following these tips, you can include all of the doors and windows on your floor plan. This will make your floor plan more clear and easy to read, and it will also help to ensure that your construction project is completed correctly.
Show the location of plumbing fixtures.
Plumbing fixtures are an important part of any building, and they should be shown on the floor plan. Plumbing fixtures include sinks, toilets, showers, and bathtubs. By showing the location of plumbing fixtures on the floor plan, you can help to ensure that the building is properly plumbed and that the fixtures are in the most convenient locations.
There are a few things to keep in mind when showing the location of plumbing fixtures on the floor plan. First, be sure to draw the fixtures to the correct scale. This means that the fixtures should be the same size on your plan as they are in the actual building. Second, be sure to position the fixtures in the correct location. This means that the fixtures should be in the same place on your plan as they are in the actual building.
In addition to drawing the plumbing fixtures, you should also label them. This will help to identify the different fixtures on the floor plan. You can label the fixtures with their names or their functions. For example, you could label the kitchen sink as “Kitchen Sink” or “Sink 1.” You could label the master bathroom toilet as “Master Bathroom Toilet” or “Toilet 2.” Labeling the plumbing fixtures will make your floor plan more clear and easy to read.
- Show the location of all plumbing fixtures, including sinks, toilets, showers, and bathtubs.
This will help to ensure that the building is properly plumbed and that the fixtures are in the most convenient locations.
- Draw the plumbing fixtures to the correct scale.
This means that the fixtures should be the same size on your plan as they are in the actual building.
- Position the plumbing fixtures in the correct location.
This means that the fixtures should be in the same place on your plan as they are in the actual building.
- Label the plumbing fixtures with their names or their functions.
This will help to identify the different fixtures on the floor plan.
By following these tips, you can show the location of plumbing fixtures on your floor plan. This will make your floor plan more clear and easy to read, and it will also help to ensure that the building is properly plumbed.
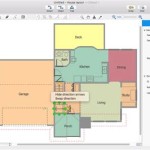
Indicate the direction of north.
Indicating the direction of north on a floor plan is important for a few reasons. First, it helps to orient the reader and to understand the layout of the building. Second, it can be used to determine the amount of sunlight that a particular space will receive. Third, it can be used to determine the prevailing wind direction, which can be important for designing ventilation systems.
- It helps to orient the reader and to understand the layout of the building.
When you look at a floor plan, it can be helpful to know which direction is north. This will help you to orient yourself and to understand the layout of the building. For example, if you know that the north side of the building is the front, then you will know that the rooms on the north side of the floor plan are the front rooms.
- It can be used to determine the amount of sunlight that a particular space will receive.
The amount of sunlight that a particular space receives can be determined by its orientation to the sun. For example, a room that faces south will receive more sunlight than a room that faces north. By indicating the direction of north on the floor plan, you can determine how much sunlight each space will receive.
- It can be used to determine the prevailing wind direction, which can be important for designing ventilation systems.
The prevailing wind direction is the direction from which the wind most frequently blows. By indicating the direction of north on the floor plan, you can determine the prevailing wind direction. This information can be used to design ventilation systems that will take advantage of the prevailing wind to ventilate the building.
There are a few different ways to indicate the direction of north on a floor plan. One way is to use a north arrow. A north arrow is a symbol that indicates the direction of north. Another way to indicate the direction of north is to use a compass rose. A compass rose is a symbol that shows the directions of north, south, east, and west.
Regardless of which method you use, it is important to indicate the direction of north on your floor plan. This will help to orient the reader and to understand the layout of the building.
Label all rooms and spaces.
Labeling all rooms and spaces on a floor plan is important for a few reasons. First, it helps to identify the different spaces on the plan. Second, it can help to orient the reader and to understand the layout of the building. Third, it can be used to create a schedule of finishes, which is a document that lists the materials and finishes that will be used in each space.
- It helps to identify the different spaces on the plan.
When you look at a floor plan, it can be helpful to know what each space is used for. For example, if you are looking at a floor plan of a house, you will want to know which rooms are bedrooms, bathrooms, kitchens, and living rooms. Labeling the rooms and spaces on the plan will help you to identify the different spaces and to understand the layout of the building.
- It can help to orient the reader and to understand the layout of the building.
Labeling the rooms and spaces on the plan can help to orient the reader and to understand the layout of the building. For example, if you are looking at a floor plan of a house, you will be able to tell which rooms are on the first floor and which rooms are on the second floor. You will also be able to tell which rooms are on the front of the house and which rooms are on the back of the house.
- It can be used to create a schedule of finishes.
A schedule of finishes is a document that lists the materials and finishes that will be used in each space. The schedule of finishes is used by contractors to bid on the project and to order materials. Labeling the rooms and spaces on the floor plan can help to create a schedule of finishes.
There are a few different ways to label rooms and spaces on a floor plan. One way is to use text labels. Text labels are simply words that identify the different spaces on the plan. Another way to label rooms and spaces is to use symbols. Symbols are graphic representations of different spaces. For example, a bed symbol could be used to represent a bedroom. A toilet symbol could be used to represent a bathroom. A kitchen symbol could be used to represent a kitchen.
Regardless of which method you use, it is important to label all of the rooms and spaces on your floor plan. This will help to identify the different spaces on the plan, to orient the reader, and to understand the layout of the building.
Add furniture and other details.
Once you have drawn the basic floor plan, you can start to add furniture and other details. This will help to make the floor plan more realistic and to give you a better idea of how the space will be used. When adding furniture and other details, it is important to keep the following things in mind:
- The scale of the furniture and other details should be consistent with the scale of the floor plan.
This means that the furniture and other details should be drawn to the same scale as the floor plan. For example, if the floor plan is drawn to a scale of 1/4 inch = 1 foot, then the furniture and other details should also be drawn to a scale of 1/4 inch = 1 foot.
- The furniture and other details should be positioned in a way that makes sense.
This means that the furniture and other details should be placed in a way that would be possible in real life. For example, you would not place a bed in the middle of a room or a couch in the middle of a doorway.
- The furniture and other details should be labeled.
This will help to identify the different pieces of furniture and other details on the floor plan. You can label the furniture and other details with their names or their functions. For example, you could label a bed as “Bed” or “Master Bedroom Bed.” You could label a couch as “Couch” or “Living Room Couch.”
- The furniture and other details should be drawn in a way that is clear and easy to read.
This means that the furniture and other details should be drawn with clean lines and simple shapes. You should also avoid using too much detail, as this can make the floor plan difficult to read.
By following these tips, you can add furniture and other details to your floor plan in a way that is both accurate and informative. This will help you to create a floor plan that is both useful and easy to understand.
Create a legend to explain any symbols.
A legend is a key that explains the meaning of any symbols that are used on a floor plan. Symbols are used to represent different features of a building, such as walls, doors, windows, and plumbing fixtures. By creating a legend, you can help the reader to understand the floor plan and to identify the different features of the building.
- Use simple and clear symbols.
The symbols that you use in your legend should be simple and clear. This will make it easy for the reader to understand the meaning of each symbol.
- Be consistent in your use of symbols.
Once you have chosen a symbol to represent a particular feature, use that symbol consistently throughout the floor plan. This will help the reader to identify the different features of the building quickly and easily.
- Label your symbols clearly.
Each symbol in your legend should be clearly labeled. This will help the reader to identify the meaning of each symbol.
- Place your legend in a convenient location.
The legend should be placed in a convenient location on the floor plan. This will make it easy for the reader to find and use the legend.
By following these tips, you can create a legend that will help the reader to understand your floor plan and to identify the different features of the building.


Related Posts