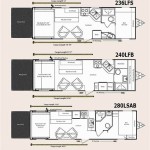
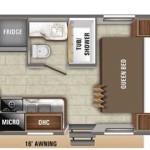
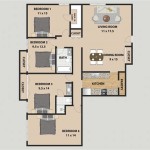
Creating a floor plan is the process of drawing a detailed diagram of a building or room, showing the layout of the space and the location of walls, doors, windows, and other features. A floor plan is an essential tool for architects, builders, and interior designers, as it allows them to visualize and plan the space before construction begins. Floor plans can also be used to create virtual tours of buildings and to help people navigate unfamiliar spaces.
There are many different ways to make a floor plan, and the best method will vary depending on the purpose of the plan and the level of detail required. Some common methods include drawing a floor plan on graph paper by hand, using a computer-aided design (CAD) program, or using a 3D modeling program. Once a floor plan has been created, it can be used to plan the layout of furniture, to determine the square footage of a space, or to calculate the cost of materials.
The next section of this article will provide a step-by-step guide to making a floor plan using a CAD program. We will also provide some tips on how to use floor plans effectively.
Here are 9 important points about making a floor plan:
- Define the purpose of the floor plan.
- Determine the level of detail required.
- Select the appropriate method for creating the floor plan.
- Measure the space accurately.
- Draw the walls, doors, and windows.
- Add other features such as furniture and fixtures.
- Label the rooms and spaces.
- Create a scale for the floor plan.
- Review the floor plan for accuracy.
By following these steps, you can create a floor plan that is both accurate and informative.
Define the purpose of the floor plan.
The first step in making a floor plan is to define the purpose of the plan. This will help you determine the level of detail required and the best method for creating the plan. For example, if you are creating a floor plan for a new home, you will need to include all of the rooms, walls, doors, and windows. You may also want to include furniture and other fixtures. However, if you are creating a floor plan for a simple office space, you may only need to include the walls, doors, and windows.
Here are some common purposes for floor plans:
- To plan the layout of a new building or renovation. Floor plans are essential for architects and builders to visualize and plan the space before construction begins.
- To create virtual tours of buildings. Floor plans can be used to create virtual tours of buildings, which can be helpful for marketing purposes or for helping people navigate unfamiliar spaces.
- To determine the square footage of a space. Floor plans can be used to calculate the square footage of a space, which is necessary for determining property taxes and insurance premiums.
- To calculate the cost of materials. Floor plans can be used to calculate the cost of materials for a new building or renovation.
Once you have defined the purpose of the floor plan, you can move on to the next step, which is to determine the level of detail required.
Determine the level of detail required.
The level of detail required for a floor plan will vary depending on the purpose of the plan. For example, if you are creating a floor plan for a new home, you will need to include all of the rooms, walls, doors, and windows. You may also want to include furniture and other fixtures. However, if you are creating a floor plan for a simple office space, you may only need to include the walls, doors, and windows.
Here are some factors to consider when determining the level of detail required for a floor plan:
- The purpose of the floor plan. As mentioned above, the purpose of the floor plan will determine the level of detail required. For example, a floor plan for a new home will require more detail than a floor plan for a simple office space.
- The audience for the floor plan. Who will be using the floor plan? If the floor plan is for a builder or architect, it will need to be more detailed than a floor plan for a homeowner or renter.
- The scale of the floor plan. The scale of the floor plan will also affect the level of detail required. A large-scale floor plan will show more detail than a small-scale floor plan.
Once you have considered these factors, you can determine the appropriate level of detail for your floor plan.
Here are some tips for determining the level of detail for a floor plan:
- Start with a simple floor plan and add detail as needed.
- Use different line weights and symbols to represent different features.
- Label all of the rooms and spaces.
- Create a scale for the floor plan.
- Review the floor plan for accuracy.
By following these tips, you can create a floor plan that is both accurate and informative.
Select the appropriate method for creating the floor plan.
Once you have defined the purpose of the floor plan and determined the level of detail required, you can select the appropriate method for creating the floor plan.
There are three main methods for creating a floor plan:
- Drawing a floor plan on graph paper by hand. This is the most basic method for creating a floor plan. It is relatively simple and inexpensive, but it can be time-consuming and difficult to create accurate plans.
- Using a computer-aided design (CAD) program. CAD programs areused for creating technical drawings, including floor plans. CAD programs are more expensive than drawing a floor plan by hand, but they offer a number of advantages, such as the ability to create accurate plans quickly and easily.
- Using a 3D modeling program. 3D modeling programs allow you to create three-dimensional models of buildings and spaces. 3D modeling programs are more expensive than CAD programs, but they offer the most realistic and detailed representation of a space.
The best method for creating a floor plan will depend on your needs and budget. If you need a simple floor plan for a small space, drawing a floor plan on graph paper by hand may be sufficient. However, if you need a more detailed floor plan for a larger space, you may want to consider using a CAD program or a 3D modeling program.
Measure the space accurately.
Measuring the space accurately is essential for creating a floor plan that is to scale. To measure the space accurately, you will need a tape measure and a pencil.
Start by measuring the length and width of the room. Be sure to measure the room in feet and inches. Once you have measured the length and width of the room, you can calculate the square footage of the room by multiplying the length by the width.
Next, measure the height of the room from the floor to the ceiling. Be sure to measure the height of the room in feet and inches.
Once you have measured the length, width, and height of the room, you can begin to draw the floor plan.
- Measure the walls. Measure the length of each wall in feet and inches. Be sure to measure the walls from corner to corner.
- Measure the doors and windows. Measure the width and height of each door and window in feet and inches. Be sure to measure the doors and windows from the inside edge of the frame.
- Measure the fixtures. Measure the width and depth of any fixtures, such as cabinets, appliances, and furniture. Be sure to measure the fixtures from the outside edge.
- Measure the stairs. Measure the width and height of any stairs in feet and inches. Be sure to measure the stairs from the top of the bottom step to the top of the top step.
By following these steps, you can measure the space accurately and create a floor plan that is to scale.
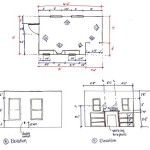
Draw the walls, doors, and windows.
Once you have measured the space accurately, you can begin to draw the floor plan. Start by drawing the walls. To draw the walls, use a ruler or a straight edge to draw a line from one corner of the room to the other corner. Be sure to measure the walls as you draw them so that they are to scale.
Once you have drawn the walls, you can add the doors and windows. To draw a door, draw a rectangle on the wall. The width of the rectangle should be the width of the door in feet and inches. The height of the rectangle should be the height of the door in feet and inches. To draw a window, draw a rectangle on the wall. The width of the rectangle should be the width of the window in feet and inches. The height of the rectangle should be the height of the window in feet and inches.
Be sure to label all of the doors and windows. To label a door, write the name of the room that the door leads to next to the door. To label a window, write the direction that the window faces next to the window.
Once you have drawn all of the walls, doors, and windows, you can move on to the next step, which is to add other features to the floor plan.
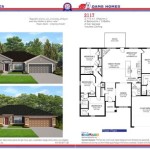
Add other features such as furniture and fixtures.
Once you have drawn the walls, doors, and windows, you can add other features to the floor plan, such as furniture and fixtures. Adding other features to the floor plan can help you to visualize the space and to plan the layout of the room.
- Furniture: Furniture can be added to the floor plan to show the layout of the room and to help you to visualize the space. To add furniture to the floor plan, draw a rectangle or a circle to represent each piece of furniture. Be sure to label each piece of furniture so that you can easily identify it.
- Fixtures: Fixtures are objects that are attached to the walls, floor, or ceiling of a room. Fixtures can include things like cabinets, appliances, and light fixtures. To add fixtures to the floor plan, draw a rectangle or a circle to represent each fixture. Be sure to label each fixture so that you can easily identify it.
- Electrical outlets and switches: Electrical outlets and switches can be added to the floor plan to show the location of these features. To add electrical outlets and switches to the floor plan, draw a small circle to represent each outlet or switch. Be sure to label each outlet or switch so that you can easily identify it.
- Plumbing fixtures: Plumbing fixtures can be added to the floor plan to show the location of these features. Plumbing fixtures can include things like sinks, toilets, and showers. To add plumbing fixtures to the floor plan, draw a small circle to represent each fixture. Be sure to label each fixture so that you can easily identify it.
By adding other features to the floor plan, you can create a more complete and accurate representation of the space.
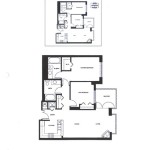
Label the rooms and spaces.
Once you have added all of the features to the floor plan, you can label the rooms and spaces. Labeling the rooms and spaces can help you to identify the different areas of the floor plan and to visualize the space.
- To label a room, write the name of the room inside the room. For example, you could write “Kitchen” inside the kitchen.
- To label a space, write the name of the space inside the space. For example, you could write “Living room” inside the living room.
- You can also use labels to indicate the function of a space. For example, you could write “Dining area” inside the dining area.
- Be sure to label all of the rooms and spaces so that you can easily identify them.
By labeling the rooms and spaces, you can create a more complete and accurate representation of the space.
Create a scale for the floor plan.
A scale is a ratio that compares the size of an object on a drawing to the size of the actual object. When creating a floor plan, it is important to create a scale so that the plan is accurate and easy to read.
There are two main types of scales: fractional scales and graphic scales. Fractional scales are written as a fraction, such as 1/4 or 1/2. This means that one unit on the drawing represents four or two units of the actual object, respectively. Graphic scales are drawn as a line that is divided into equal parts. Each part of the line represents a certain number of units of the actual object.
When choosing a scale for your floor plan, it is important to consider the size of the space and the level of detail that you need to show. For example, if you are creating a floor plan for a small room, you may want to use a larger scale, such as 1/4 or 1/2. This will allow you to show more detail in the floor plan. If you are creating a floor plan for a large space, you may want to use a smaller scale, such as 1/8 or 1/16. This will allow you to show the overall layout of the space without having to include too much detail.
Once you have chosen a scale, be sure to label it on the floor plan. This will help others to understand the size of the space and the level of detail that is shown in the floor plan.
Review the floor plan for accuracy.
Once you have created a floor plan, it is important to review it for accuracy. This will help you to identify any errors or omissions in the floor plan so that you can correct them before you begin construction or renovation.
To review the floor plan for accuracy, follow these steps:
- Check the measurements. Make sure that all of the measurements in the floor plan are accurate. You can do this by measuring the space yourself or by using a measuring tape or ruler.
- Check the layout. Make sure that the layout of the floor plan is accurate. This includes the location of the walls, doors, windows, and other features.
- Check the scale. Make sure that the scale of the floor plan is accurate. This means that the size of the objects in the floor plan should be proportional to the size of the actual objects.
- Check the labels. Make sure that all of the labels in the floor plan are accurate. This includes the names of the rooms and spaces, as well as the labels for the doors, windows, and other features.
- Ask for feedback. Ask someone else to review the floor plan for accuracy. This can help you to identify any errors or omissions that you may have missed.
By following these steps, you can review the floor plan for accuracy and ensure that it is correct before you begin construction or renovation.
Once you have reviewed the floor plan for accuracy, you can begin to use it to plan the layout of your space. The floor plan can be used to determine the square footage of the space, to calculate the cost of materials, and to create a virtual tour of the space.


Related Posts