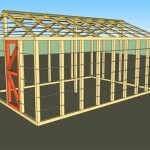
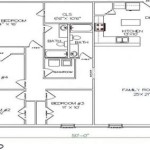
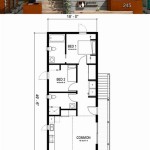
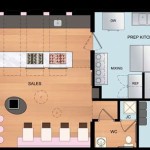
A floor plan is a detailed drawing that represents the layout of a building or room. It shows the location of walls, windows, doors, stairs, and other features. Floor plans are used for a variety of purposes, including:
– Planning the layout of a new building or renovation
– Marketing and selling real estate
– Planning for events or renovations
Creating a floor plan is a relatively simple process, but it is important to be accurate and consistent. The following steps will help you create a floor plan that is both accurate and easy to understand:
When creating a floor plan, there are are a few key points to keep in mind:
- Use a consistent scale
- Draw walls accurately
- Include all windows and doors
- Label all rooms
- Use different line weights for different elements
- Add furniture and fixtures
- Use a legend to explain symbols
- Create a title block
- Get feedback from others
By following these tips, you can create a floor plan that is both accurate and easy to understand.
Use a consistent scale
When creating a floor plan, it is important to use a consistent scale. This means that all of the measurements on the floor plan are drawn to the same scale. For example, if you are using a scale of 1/4 inch = 1 foot, then all of the measurements on the floor plan should be drawn at that scale.
- Benefits of using a consistent scale:
There are several benefits to using a consistent scale when creating a floor plan. First, it makes it easier to accurately measure distances and areas on the floor plan. Second, it makes it easier to compare different floor plans to each other. Third, it makes it easier to create accurate estimates for materials and labor costs.
- How to choose a scale:
The scale that you choose for your floor plan will depend on the size of the building or room that you are drawing. For small buildings or rooms, you may want to use a scale of 1/4 inch = 1 foot. For larger buildings or rooms, you may want to use a scale of 1/8 inch = 1 foot or even 1/16 inch = 1 foot.
- Tips for using a consistent scale:
Once you have chosen a scale for your floor plan, it is important to use it consistently throughout the drawing. This means that all of the measurements on the floor plan should be drawn to the same scale. You should also use the same scale when adding furniture and fixtures to the floor plan.
- Consequences of not using a consistent scale:
If you do not use a consistent scale when creating a floor plan, it will be difficult to accurately measure distances and areas on the floor plan. It will also be difficult to compare different floor plans to each other. Additionally, it may lead to inaccurate estimates for materials and labor costs.
By using a consistent scale when creating a floor plan, you can ensure that the floor plan is accurate and easy to understand.
Draw walls accurately
When drawing walls on a floor plan, it is important to be accurate. This means that the walls should be drawn to scale and that they should accurately represent the layout of the building or room. There are a few things to keep in mind when drawing walls accurately:
- Use a consistent scale:
As discussed in the previous section, it is important to use a consistent scale when creating a floor plan. This means that all of the measurements on the floor plan, including the walls, should be drawn to the same scale.
- Measure carefully:
Before you start drawing the walls, it is important to carefully measure the length and width of the building or room. This will help you to ensure that the walls are drawn to the correct scale.
- Use a straightedge:
When drawing the walls, it is important to use a straightedge to ensure that the lines are straight. This will help to create a more accurate and professional-looking floor plan.
- Pay attention to details:
When drawing the walls, it is important to pay attention to details such as windows, doors, and other openings. Make sure that these openings are drawn accurately and to scale.
By following these tips, you can draw walls accurately on your floor plan. This will help to create a more accurate and easy-to-understand floor plan.
Include all windows and doors
When creating a floor plan, it is important to include all windows and doors. This information is essential for understanding the layout of a building or room and for planning purposes. Windows and doors can be represented on a floor plan using a variety of symbols, but it is important to be consistent in the symbols that you use.
To include windows on a floor plan, simply draw a rectangle to represent the window opening. The size of the rectangle should be based on the actual size of the window. You can also use a dashed line to represent the window frame. If the window has a specific type of glass, such as frosted glass or tinted glass, you can indicate this by adding a note to the floor plan.
To include doors on a floor plan, draw a rectangle to represent the door opening. The size of the rectangle should be based on the actual size of the door. You can also use a dashed line to represent the door frame. If the door is a specific type of door, such as a sliding door or a French door, you can indicate this by adding a note to the floor plan.
It is also important to indicate the direction that windows and doors open. This can be done by adding an arrow to the symbol. The arrow should point in the direction that the window or door opens.
By including all windows and doors on your floor plan, you will create a more accurate and informative document. This information can be used for a variety of purposes, such as planning renovations, marketing real estate, or planning events.
Label all rooms
When creating a floor plan, it is important to label all rooms. This will help to identify the purpose of each room and to make it easier to understand the layout of the building or room. There are a few things to keep in mind when labeling rooms:
Use clear and concise labels:
When labeling rooms, it is important to use clear and concise labels. This means using labels that are easy to read and understand. Avoid using abbreviations or jargon that may not be familiar to everyone.
Be consistent:
It is also important to be consistent when labeling rooms. This means using the same label for the same room throughout the floor plan. For example, if you label a room as “Bedroom 1” on one page, you should label it as “Bedroom 1” on all other pages.
Use a legend:
If you are using a lot of different labels on your floor plan, it can be helpful to create a legend. A legend is a key that explains the meaning of the different labels. This can be helpful for people who are unfamiliar with the floor plan or who are looking for a specific room.
By labeling all rooms on your floor plan, you will create a more informative and easy-to-understand document. This information can be used for a variety of purposes, such as planning renovations, marketing real estate, or planning events.
Use different line weights for different elements
When creating a floor plan, it is important to use different line weights for different elements. This will help to create a more visually appealing and easy-to-understand floor plan. There are a few things to keep in mind when using different line weights:
- Use a heavier line weight for walls:
Walls are the most important elements of a floor plan, so they should be drawn with a heavier line weight. This will help to make them stand out from the other elements on the floor plan.
- Use a lighter line weight for windows and doors:
Windows and doors are less important than walls, so they can be drawn with a lighter line weight. This will help to create a more visually appealing floor plan.
- Use a dashed line weight for optional elements:
Optional elements, such as furniture and fixtures, can be drawn with a dashed line weight. This will help to distinguish them from the other elements on the floor plan.
- Use a consistent line weight throughout the floor plan:
It is important to use a consistent line weight throughout the floor plan. This will help to create a more professional-looking floor plan.
By using different line weights for different elements, you can create a more visually appealing and easy-to-understand floor plan. This information can be used for a variety of purposes, such as planning renovations, marketing real estate, or planning events.
Add furniture and fixtures
Furniture and fixtures are important elements of a floor plan because they can help to show how a space will be used. When adding furniture and fixtures to a floor plan, there are a few things to keep in mind:
- Use the correct scale:
When adding furniture and fixtures to a floor plan, it is important to use the correct scale. This means that the furniture and fixtures should be drawn to the same scale as the rest of the floor plan.
- Use symbols:
Furniture and fixtures can be represented on a floor plan using symbols. There are many different symbols that can be used, but it is important to be consistent in the symbols that you use. For example, you could use a rectangle to represent a bed, a circle to represent a table, and a triangle to represent a chair.
- Label the furniture and fixtures:
It is also important to label the furniture and fixtures on your floor plan. This will help to identify the purpose of each item and to make it easier to understand the layout of the space.
- Use a legend:
If you are using a lot of different symbols on your floor plan, it can be helpful to create a legend. A legend is a key that explains the meaning of the different symbols. This can be helpful for people who are unfamiliar with the floor plan or who are looking for a specific item.
By adding furniture and fixtures to your floor plan, you will create a more informative and easy-to-understand document. This information can be used for a variety of purposes, such as planning renovations, marketing real estate, or planning events.
Use a legend to explain symbols
A legend is a key that explains the meaning of the different symbols used on a floor plan. It is an important part of a floor plan because it helps people to understand the layout of the space and the purpose of each item.
There are many different types of symbols that can be used on a floor plan. Some common symbols include:
- Rectangles to represent walls
- Circles to represent windows
- Triangles to represent doors
- Squares to represent furniture
- Lines to represent plumbing and electrical fixtures
When creating a legend, it is important to be clear and concise. Each symbol should be labeled with a brief description of what it represents. For example, the legend could include the following entries:
- Rectangle: Wall
- Circle: Window
- Triangle: Door
- Square: Furniture
- Line: Plumbing or electrical fixture
By using a legend, you can make your floor plan more informative and easy to understand. This is especially important if you are sharing the floor plan with someone who is not familiar with the space.
Here are some additional tips for using a legend:
- Use a consistent style for all of the symbols in your legend.
- Place the legend in a prominent location on the floor plan.
- Make sure that the legend is easy to read and understand.
Create a title block
A title block is a section of a floor plan that contains important information about the project, such as the project name, the date, the scale, and the name of the person who created the floor plan. The title block is typically located in the lower right-hand corner of the floor plan.
The following information should be included in the title block:
- Project name: The name of the project, such as “New House” or “Office Renovation”.
- Date: The date that the floor plan was created.
- Scale: The scale of the floor plan, such as 1/4 inch = 1 foot or 1/8 inch = 1 foot.
- Name of the person who created the floor plan: The name of the person who created the floor plan, such as “John Smith” or “Jane Doe”.
The title block can also include other information, such as the project number, the revision number, and the contact information for the person who created the floor plan. However, it is important to keep the title block concise and easy to read.
By creating a title block, you can make your floor plan more professional and informative. This is especially important if you are sharing the floor plan with someone who is not familiar with the project.
Here are some additional tips for creating a title block:
- Use a consistent style for all of the text in the title block.
- Place the title block in a prominent location on the floor plan.
- Make sure that the title block is easy to read and understand.
Get feedback from others
Once you have created a floor plan, it is important to get feedback from others. This will help you to identify any errors or omissions in the floor plan and to make sure that the floor plan is clear and easy to understand. There are a few different ways to get feedback on your floor plan:
Ask a friend or family member to review your floor plan:
One option is to ask a friend or family member to review your floor plan. This is a good option if you are looking for general feedback on the layout of the space. Your friend or family member may be able to provide you with insights that you would not have thought of on your own.
Hire a professional to review your floor plan:
If you are looking for more detailed feedback on your floor plan, you may want to consider hiring a professional. A professional can review your floor plan for errors and omissions and can also provide you with suggestions for improvement. There are many different types of professionals who can review floor plans, such as architects, engineers, and interior designers.
Post your floor plan online:
Another option is to post your floor plan online and ask for feedback from other people. There are many different online forums and websites where you can post your floor plan and get feedback from other users. This is a good option if you are looking for feedback from people who have experience with floor plans.
Once you have received feedback on your floor plan, it is important to take the time to review the feedback and make any necessary changes. This will help you to create a floor plan that is accurate, clear, and easy to understand.


Related Posts