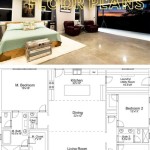
A recording studio floor plan serves as a visual representation of the layout and arrangement of a recording studio. It outlines the placement of essential equipment, such as recording desks, mixing consoles, acoustic panels, and instruments. Floor plans are crucial for optimizing studio workflow, ensuring efficient equipment placement, and creating an acoustically balanced environment.
For instance, a professional recording studio may incorporate dedicated control rooms, isolation booths, and live performance spaces. Each of these areas requires specific acoustic treatments and equipment setups, which are meticulously planned out in the floor plan. By carefully considering the placement of soundproofing materials, engineers can minimize unwanted noise and reflections, ensuring pristine audio recordings.
In the following sections, we will delve into the key considerations, best practices, and design principles involved in creating effective recording studio floor plans. We will explore various layout configurations, discuss the impact of acoustics on floor planning, and provide insights into the latest technologies that enhance studio efficiency.
Here are 10 important points to consider when designing recording studio floor plans:
- Acoustic Optimization
- Workflow Efficiency
- Equipment Placement
- Soundproofing
- Room Proportions
- Control Room Design
- Isolation Booths
- Live Performance Spaces
- Cable Management
- Future Expansion
By carefully considering these factors, you can create a recording studio floor plan that meets your specific needs and ensures optimal recording conditions for years to come.
Acoustic Optimization
Acoustic optimization is paramount in recording studio floor planning. The placement of soundproofing materials, acoustic panels, and other treatments can significantly impact the quality of audio recordings. By carefully considering the acoustics of the space, engineers can minimize unwanted noise, reduce standing waves, and create a balanced and immersive listening environment.
One key aspect of acoustic optimization is the use of soundproofing materials. These materials help to isolate the studio from external noise sources, such as traffic or construction. Soundproofing can be achieved through the use of dense materials, such as concrete or lead, or by creating multiple layers of drywall with staggered studs. It is important to seal any gaps or cracks around doors and windows to prevent sound leakage.
Another important consideration is the placement of acoustic panels. Acoustic panels absorb sound waves, helping to reduce reverberation and create a more controlled acoustic environment. Panels can be made from a variety of materials, such as fiberglass, foam, or wood. They can be placed on walls, ceilings, and even furniture to optimize the acoustics of the space.
Finally, it is important to consider the overall shape and dimensions of the room. Certain room proportions can create unwanted acoustic effects, such as standing waves or flutter echoes. By carefully designing the room’s dimensions and incorporating acoustic treatments, engineers can create a space that is acoustically balanced and free from distracting resonances.
Acoustic optimization is an essential aspect of recording studio floor planning. By carefully considering the acoustics of the space and implementing the appropriate treatments, engineers can create a recording environment that captures pristine audio and provides an immersive listening experience.
Workflow Efficiency
Workflow efficiency is another critical consideration in recording studio floor planning. A well-designed floor plan can help to streamline the recording process, reduce downtime, and improve overall productivity.
One key aspect of workflow efficiency is the placement of equipment. All essential equipment, such as recording desks, mixing consoles, and outboard gear, should be within easy reach of the engineer. The layout should also allow for easy access to power outlets, patch bays, and other connections.
Another important consideration is the use of dedicated spaces for different tasks. For example, a dedicated control room can help to isolate the engineer from the noise of the live performance space. Isolation booths can be used to record vocals or instruments without bleed from other sources. By creating dedicated spaces for different tasks, engineers can work more efficiently and avoid distractions.
Finally, it is important to consider the flow of people and equipment within the studio. The floor plan should allow for easy movement of musicians, engineers, and equipment without creating bottlenecks or tripping hazards. Wide hallways and clear pathways are essential for maintaining a smooth workflow.
By carefully considering workflow efficiency in the recording studio floor plan, engineers can create a space that is both productive and enjoyable to work in.
Equipment Placement
Equipment placement is crucial in recording studio floor planning. The placement of recording desks, mixing consoles, outboard gear, and other essential equipment can significantly impact workflow efficiency and the overall quality of recordings.
- Proximity to Engineer
All essential equipment should be within easy reach of the engineer. This includes the recording desk, mixing console, outboard gear, and any other equipment that the engineer needs to access frequently. By placing equipment close to the engineer, you can streamline the recording process and reduce downtime.
- Access to Power and Connections
All equipment should have easy access to power outlets, patch bays, and other connections. This may seem like a minor consideration, but it can be a major headache if equipment is difficult to plug in or connect. By carefully planning the placement of equipment and connections, you can avoid unnecessary downtime and frustration.
- Signal Flow
The placement of equipment should also consider signal flow. For example, the recording desk should be placed in a central location so that signals can easily be routed from the recording sources to the mixing console. The mixing console should be placed so that the engineer has a clear view of all of the input and output channels. By considering signal flow in the floor plan, you can create a more efficient and user-friendly studio.
- Ergonomics
Finally, it is important to consider ergonomics when placing equipment. The engineer should be able to work comfortably and efficiently for long periods of time. This means that all equipment should be placed at a comfortable height and within easy reach. The engineer should also have a clear view of all of the equipment and controls.
By carefully considering equipment placement in the recording studio floor plan, engineers can create a space that is both productive and enjoyable to work in.
Soundproofing
Soundproofing is an essential aspect of recording studio floor planning. Unwanted noise from outside sources can ruin otherwise perfect recordings. By carefully considering soundproofing in the floor plan, engineers can create a space that is isolated from external noise and provides a pristine recording environment.
There are a number of different soundproofing techniques that can be used in recording studios. One common technique is to use soundproofing materials, such as fiberglass, foam, or rubber, to absorb sound waves and prevent them from reflecting off of walls and ceilings. Another technique is to use multiple layers of drywall with staggered studs to create a soundproof barrier.
In addition to using soundproofing materials, it is also important to seal any gaps or cracks around doors and windows. Even small gaps can allow sound to leak into the studio, so it is important to seal them carefully with weatherstripping or caulk. It is also important to consider the type of flooring used in the studio. Hard flooring materials, such as tile or hardwood, can reflect sound waves and create unwanted noise. Carpet or rugs can help to absorb sound waves and reduce noise levels.
Finally, it is important to consider the placement of equipment in the studio. Noisy equipment, such as air conditioners or computers, should be placed in a separate room or in an isolated area of the studio. By carefully considering soundproofing in the floor plan, engineers can create a recording studio that is isolated from external noise and provides a pristine recording environment.
Room Proportions
The proportions of a recording studio can have a significant impact on the acoustics of the space. Certain room dimensions can create unwanted acoustic effects, such as standing waves or flutter echoes. By carefully considering room proportions in the floor plan, engineers can create a space that is acoustically balanced and free from distracting resonances.
One important aspect of room proportions is the length-to-width ratio. A room that is too long or too narrow can create standing waves, which are low-frequency resonances that can muddy the sound. A good length-to-width ratio for a recording studio is between 1.5:1 and 2:1. This ratio helps to minimize standing waves and create a more evenly balanced sound.
Another important aspect of room proportions is the height of the ceiling. A ceiling that is too high can create flutter echoes, which are high-frequency resonances that can make the sound harsh and unpleasant. A good ceiling height for a recording studio is between 8 and 12 feet. This height range helps to minimize flutter echoes and create a more natural-sounding space.
Finally, it is important to consider the shape of the room. Rooms with irregular shapes can create unpredictable acoustic effects. It is best to choose a room with a rectangular or square shape, as these shapes are less likely to create unwanted resonances.
By carefully considering room proportions in the recording studio floor plan, engineers can create a space that is acoustically balanced and free from distracting resonances. This will result in better sounding recordings and a more enjoyable listening experience.
Control Room Design
The control room is the heart of the recording studio. It is where the engineer sits and operates the recording equipment. The design of the control room is critical to the overall functionality and success of the studio.
One of the most important aspects of control room design is the placement of the mixing console. The mixing console is the central hub of the control room, and it is where the engineer mixes the various audio sources together to create the final mix. The console should be placed in a central location within the room, and it should be easily accessible from all sides. The engineer should also have a clear view of all of the equipment in the control room.
Another important aspect of control room design is the acoustics of the room. The acoustics of the control room should be carefully controlled to ensure that the engineer can hear the mix accurately. The room should be free from standing waves and flutter echoes, and it should have a neutral frequency response. The walls and ceiling of the control room should be treated with acoustic panels to absorb sound and reduce reflections.
Finally, the control room should be designed to be comfortable and ergonomic for the engineer. The engineer should be able to work comfortably for long periods of time without experiencing fatigue or discomfort. The chair should be comfortable and supportive, and the desk should be at the correct height for the engineer to work comfortably. The control room should also be well-lit and ventilated.
By carefully considering all of these factors, engineers can design a control room that is functional, acoustically sound, and comfortable to work in. This will result in better sounding recordings and a more enjoyable mixing experience.
Isolation Booths
Isolation booths are small, soundproofed rooms that are used to record vocals or instruments without bleed from other sources. They are typically used for recording vocals, but they can also be used to record acoustic guitar, drums, and other instruments. Isolation booths are an essential part of any recording studio, and they can help to improve the quality of your recordings significantly.
One of the most important aspects of an isolation booth is its soundproofing. The booth should be constructed from soundproof materials, such as fiberglass, foam, or rubber, to prevent sound from leaking in or out. The booth should also be sealed carefully to prevent any gaps or cracks that could allow sound to escape. In addition, the booth should be placed in a quiet location, away from any sources of noise.
Another important aspect of an isolation booth is its size. The booth should be large enough to accommodate the performer and any necessary equipment, but it should not be too large, as this can create unwanted resonances. The ideal size for an isolation booth is between 4 and 6 feet wide, and 6 and 8 feet long. The height of the booth should be between 7 and 8 feet.
Finally, the isolation booth should be designed to be comfortable for the performer. The booth should be well-ventilated and have a comfortable chair or stool. The performer should also have easy access to all of the necessary equipment, such as the microphone and headphones.
By carefully considering all of these factors, engineers can design an isolation booth that is soundproof, comfortable, and functional. This will result in better sounding recordings and a more enjoyable recording experience.
Live Performance Spaces
Live performance spaces are designed to accommodate live performances and recording sessions for bands and musicians. These spaces typically include a stage area, a recording area, and a control room. Live performance spaces can be used for a variety of purposes, such as recording live albums, filming music videos, and hosting live concerts.
- Stage Area
The stage area is where the musicians perform. It should be large enough to accommodate the band and all of their equipment. The stage area should also be well-lit and have good acoustics. Additionally, the stage area should be isolated from the recording area to prevent sound leakage.
- Recording Area
The recording area is where the audio and video recordings are made. It should be located in a quiet area away from any sources of noise. The recording area should also be large enough to accommodate all of the necessary recording equipment, such as microphones, cameras, and sound mixers.
- Control Room
The control room is where the engineer operates the recording equipment and monitors the audio and video recordings. The control room should be located in a central location within the live performance space. It should also have a clear view of the stage area and the recording area.
- Acoustics
The acoustics of the live performance space are critical to the quality of the recordings. The space should be designed to minimize standing waves and flutter echoes. The walls and ceiling should be treated with acoustic panels to absorb sound and reduce reflections. Additionally, the space should be isolated from outside noise sources.
By carefully considering all of these factors, engineers can design a live performance space that is functional, acoustically sound, and comfortable to work in. This will result in better sounding recordings and a more enjoyable recording experience.
Cable Management
Cable management is an important aspect of recording studio floor planning. Poor cable management can lead to a cluttered and disorganized studio, which can make it difficult to work efficiently and safely. By carefully planning the placement of cables and using proper cable management techniques, engineers can create a clean and organized studio that is both functional and safe.
- Plan Ahead
The first step to effective cable management is to plan ahead. Before you start running cables, take some time to think about how you want to lay them out. This will help you avoid creating a tangled mess that is difficult to troubleshoot. Consider the following factors when planning your cable layout:
- The location of your equipment
- The length of your cables
- The type of cables you are using
- Use Cable Trays and Conduits
Cable trays and conduits are a great way to organize and protect your cables. Cable trays are typically made of metal or plastic and can be mounted to walls or ceilings. Conduits are similar to cable trays, but they are enclosed, which provides additional protection for your cables. Using cable trays and conduits can help to reduce clutter and improve the overall appearance of your studio.
- Label Your Cables
Labeling your cables is an important part of cable management. This will help you to identify which cables go to which pieces of equipment, which can make troubleshooting much easier. You can use a variety of methods to label your cables, such as colored tape, heat shrink tubing, or cable labels. Be sure to use a consistent labeling system so that you can easily identify your cables at a glance.
- Keep Your Cables Organized
Once you have your cables laid out and labeled, it is important to keep them organized. This will help to prevent them from becoming tangled and damaged. You can use a variety of methods to keep your cables organized, such as cable ties, velcro straps, or cable organizers. By keeping your cables organized, you can improve the overall appearance of your studio and make it easier to troubleshoot problems.
By following these cable management tips, you can create a clean and organized recording studio that is both functional and safe. This will help you to work more efficiently and avoid costly downtime.
Future Expansion
When designing a recording studio floor plan, it is important to consider future expansion. This will help to ensure that the studio can accommodate your growing needs as your business expands.
There are a number of factors to consider when planning for future expansion. One important factor is the size of the studio. If you anticipate that you will need to add more equipment or staff in the future, you will need to choose a studio that is large enough to accommodate your needs. Another important factor to consider is the layout of the studio. The layout should be flexible enough to allow for easy reconfiguration as your needs change.
In addition to the physical space of the studio, you should also consider the infrastructure of the studio when planning for future expansion. This includes the electrical system, the HVAC system, and the data network. The infrastructure should be robust enough to support your current needs and future growth.
By carefully considering all of these factors, you can design a recording studio floor plan that will accommodate your current needs and future expansion. This will help to ensure that your studio is a valuable asset for years to come.


Related Posts